SETTING UP AN INFORMATIONAL AUTODIALER
AutoCall settings require a preparatory stage, when you need to create and upload to the office audio recordings that will be heard by people from the call base. Therefore, first you need to define the type of autodialer
The most popular type of autocall is informational.
It is used when you need to communicate the same information to a group of people without the need to contact your employees. Examples: to remind people to pick up an order from the post office, or to notify them about the dispatch of an order in a retail store, or to remind them about the start of an info-business event, and similar tasks that do not require human intervention on the part of your company.
And so let’s start preparing the configuration of the information autocall.
First stage (informational). Creating an audio recording file with the information that needs to be communicated to people.
There are several options for creating records.
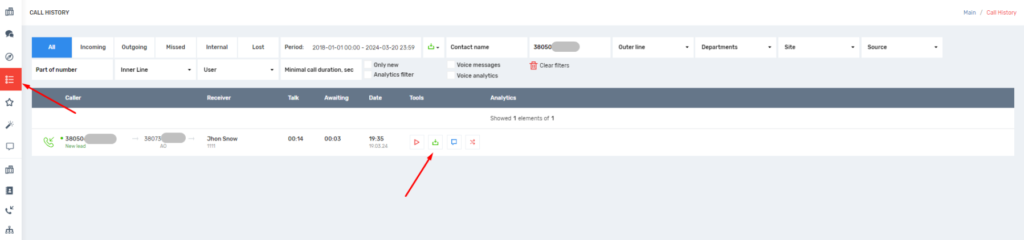
Option 1. (free of charge, low quality, possible WOW-effect) Self-record an audio file using a phone, voice recorder or other recording devices. The easiest way is to call from your personal phone to the number connected to UniTalk and say the text you want to record. Then go to the UniTalk call history, download the recording of this call and upload it as an audio file for auto-call.
Such a recording, although not of the highest quality, is often perceived by people as if they were being called by a live person rather than a robot.
Now for the step-by-step.
- Call one of your project numbers. All project numbers can be viewed in the Outer lines section

- Go to the UniTalk call history and download the recording of this call to your PC.
Great, the recording has been created and downloaded to the PC. Now it remains to upload it to the UniTalk audio file library.
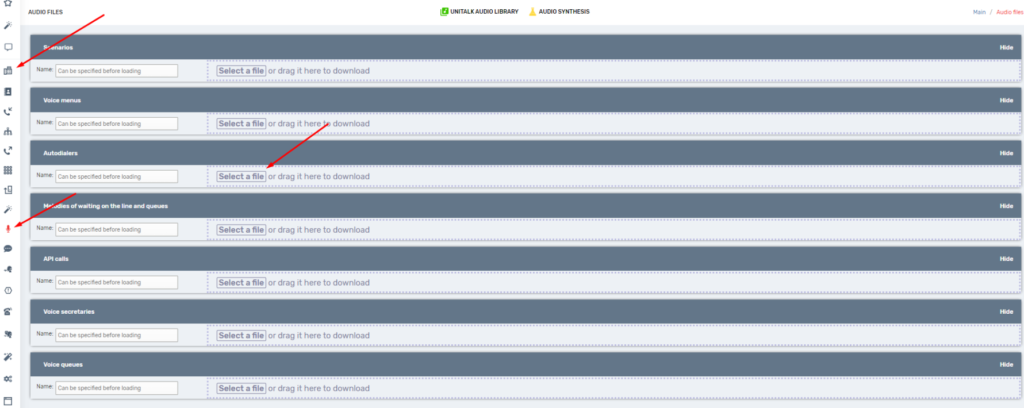
The second stage (informational). Uploading audio files to the UniTalk library.
Go to the IP-telephony section — Audio files and upload the record to the “Autodialers” block.
Great, entry uploaded, first stage passed.
Option 2. (very cheap, average quality) use speech synthesis directly in the UniTalk personal account, speech synthesis.
After creating and downloading the audio file, upload it to the UniTalk library (second step).
Option 3. (Paid, maximum quality) Order the creation of a recording through a recording studio. Again, you are free to use the services of any studio. But in order not to encounter a “cowboy operation”, we recommend you to apply to professional studios.
After creating and downloading the audio file, upload it to the UniTalk library (second step).
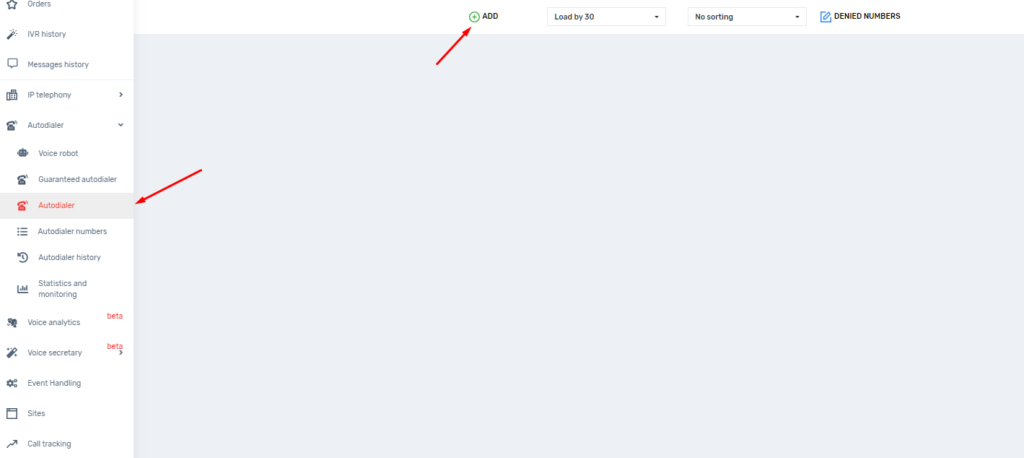
Third step. Configuring the parameters of autodialing.
Go to the section Autodialer and click “Add”.
Numbers
There are 2 options: one for cases when you need to upload many numbers at once, the other for regular upload of a small number of numbers that are easy to select, copy and paste
Option 1.
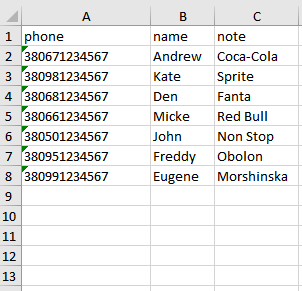
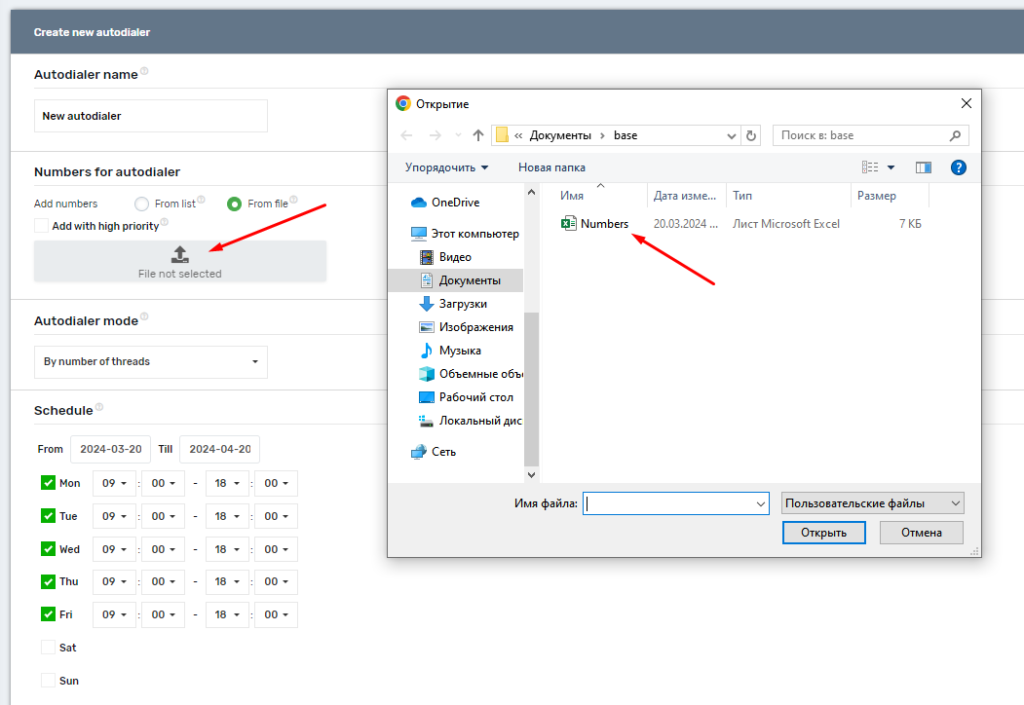
- Download a table of numbers;
- File format for downloading;
- Supported extensions are .xls or .xlsx ;
- The number of numbers with no more than 100,000;
- Column names phone, name, note;
- In the specified columns, all cells must be in text format;
- The “phone” column is the only mandatory column;
- Numbers must be in international format (+380… or 380… ). Spaces and non-numeric characters are removed automatically;
- The phone number for one call is unique, i.e. repeated numbers will not be added;
- The “name” column is a maximum of 100 characters, if more, the extra characters are cut off;
- The “note” column is a maximum of 500 characters, if more, the extra characters are cut off;
- Columns can be placed in any order;
- The presence of extraneous fields is irrelevant.
Example in the image below
You can load the table by clicking on the grey area that says “File not selected.”
Done, contacts uploaded.
Option 2. In cases when you need to upload a small number of contacts on a regular basis – it is easier and more convenient to just select the list of numbers and paste it into the number list area.
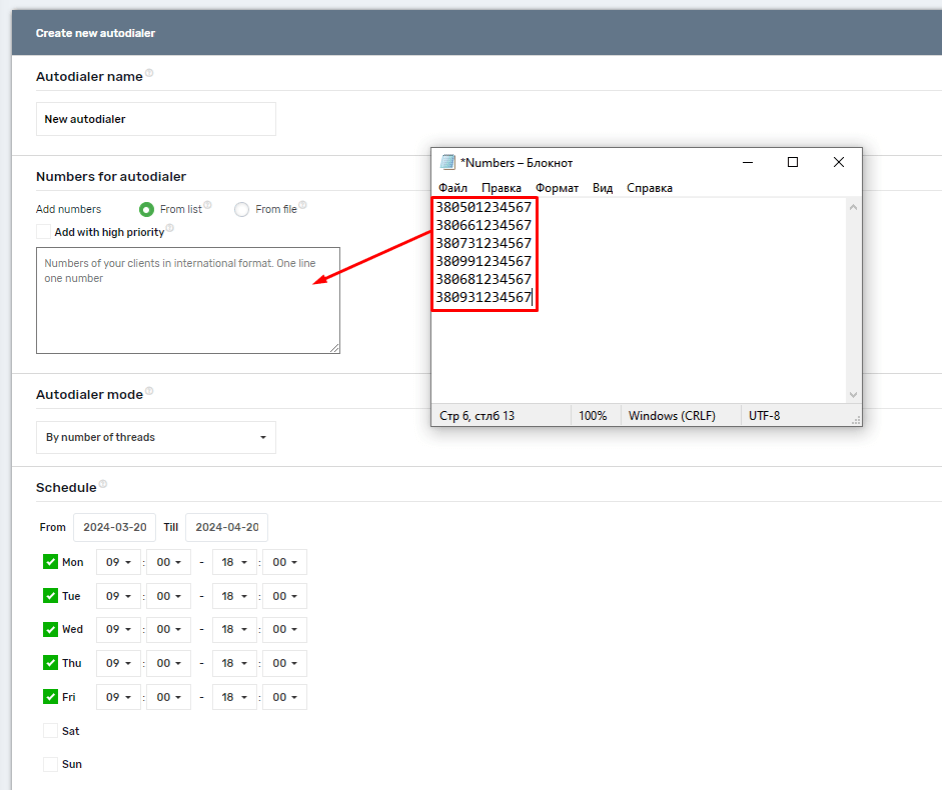
Done, contacts uploaded.
Number Priority
Relevant for re-adding numbers.
You can add contacts with or without priority. If you enable the “High Priority” setting and then upload a list of numbers, all numbers in the list will be prioritised and called in the first priority. If you add numbers without enabling the “High Priority” setting, they will be added to the end of the list.
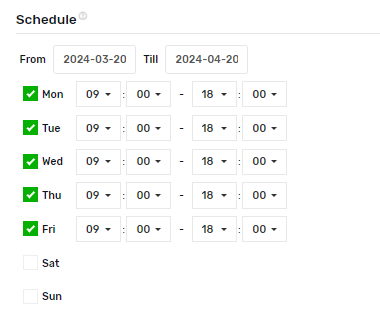
- Call Schedule. By default, a standard (as for Kiev) working week is selected.
Instructions for setting up the information autodialer
If you need to call individuals, it is better to think about when it is best to give them information. For example, notifications about events are better to do in the afternoon (13:00-15:00), and reminders to pick up an order from Nova Poshta are better to send at the end or after the working day. 17:30-18:00 or 18:30-19:00. Half an hour pause to avoid disturbing people while they are in transport.
Re-calling
In dialling there are always unsuccessful calls, some people do not pick up the phone or for other reasons the call did not take place. All such numbers can be called again. You can specify the number of repeated calls, the interval between repeated calls, repeated calls with or without priority and select the call statuses of the departments of those who do not need to be called back. For example, those who picked up the phone and dropped the call (status – Answered (dropped)).
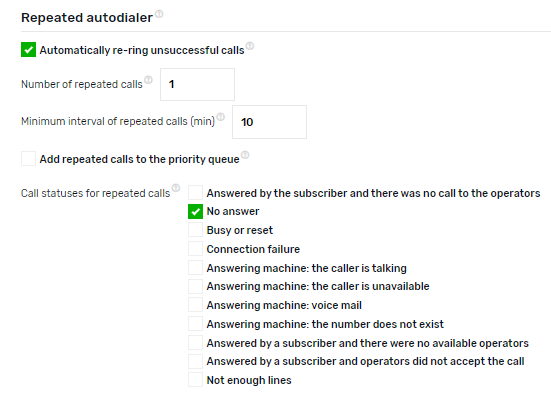
In case of cold calling – we do not recommend to specify a large number of repeated calls and a low minimum interval. People, seeing a large number of missed calls, may consider it as spam and blacklist your number or assume that something very important/urgent has happened and get nervous.
Settings
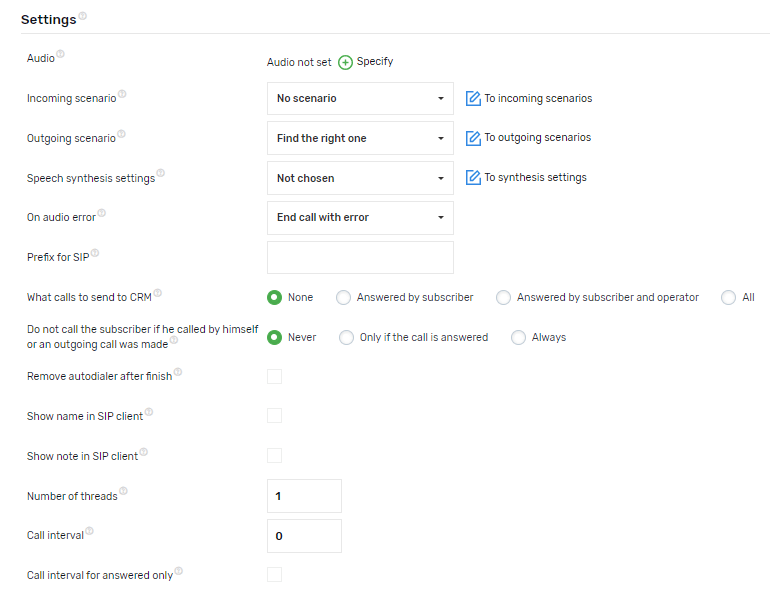
- Audio file. You choose the audio file you want people to hear.
- Incoming Scenario. In cases where you do not want to route calls to employees, Inbound Script does NOT need to be selected.
- Outbound Scenario. Select the outbound scenario in which the number from which the call is to be made is selected.
- Speech synthesis settings. This setting is required to select the profile of speech synthesis settings that will be used for audio synthesis. You can add calls with the text to be voiced from an xls/xlsx file or via API. More details about speech synthesis by link.
- On audio error.This setting allows you to select what to do if there is an error that causes the synthesised audio to fail to play. If an audio search error or audio synthesis error occurs during the call, either the general audio of the call will be used (the one selected in the “Audio instead of beeps” setting) or the call will be terminated with the status “Audio error”. You can add calls specifying audio or text for voicing from xls/xlsx file or via API.
- Prefix for SIP. Not relevant, calls to staff are not routed.
- Which calls to send to the CRM. “None” – caller calls will not be sent to the CRM system.
- Show additional information in the SIP client. Not relevant, calls are not routed to employees; “Answered by subscriber” – only ringing calls answered by the subscriber will be sent to the CRM system; “Answered by subscriber and operator” – only ringing calls answered by the subscriber and operator will be sent to the CRM system.
- Do not call the subscriber if he/she has called himself/herself or an outgoing call has been made. The setting determines what to do if the subscriber makes a direct incoming call, a tracking incoming call, or the operator makes an outgoing call to the subscriber. “Never” – call the subscriber anyway. “Only if the call is answered” – do not call the subscriber if the call is answered. “Always” – regardless of the call result, the caller will not call the subscriber.
- Display the name in the SIP client. If enabled, the caller’s name will be displayed as “phone-name” when calling the operator in the SIP client. If enabled and “show note”, it will be displayed as “phone-name-note”. You can add client numbers with name and note in the “Numbers” block by uploading an .xls or .xlsx file and clicking on the “Add Numbers” button.
- Display a note in the SIP client. If enabled, the caller’s name will be displayed as “phone-name-note” when calling the operator in the SIP client. If enabled and “show name”, it will be displayed as “phone-name-note”. You can add client numbers with name and note in the “Numbers” block by uploading an .xls or .xlsx file and clicking on the “Add Numbers” button.
- Streams. Number of parallel calls. Set the value depending on the multichannel nature of the lines and the number of available operators.
- Call Interval. Not relevant, calls to staff are not routed.
- Call interval for answered calls only. The pause between calls will only be triggered after calls that have been answered by an operator.
After filling in all the settings, save the autodialer.
The autodialer is set up and ready to call, you are excellent.
The autodialer will start automatically within a few minutes or at the nearest moment according to the schedule.
List of numbers that cannot be added to calls
You can view the whole list of numbers that are not allowed to make calls on the Autodialer page

By clicking on the “Denied numbers” button. This will open an additional menu with an option:
- Add number – if the number to which you want to prohibit calls is already present in the call, please note that it will not be deleted, but will remain in the call.
- Delete number – remove the number from the banned list
- Delete all numbers
- View a list of all numbers you cannot make calls to.
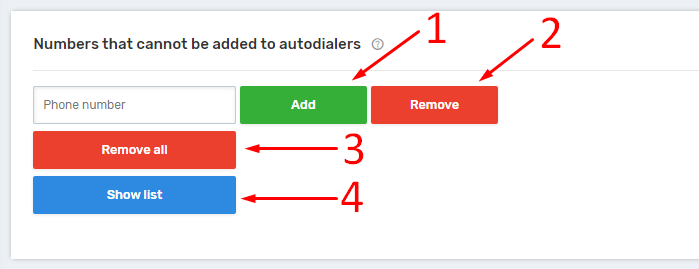
Please note that numbers must be given in international format.
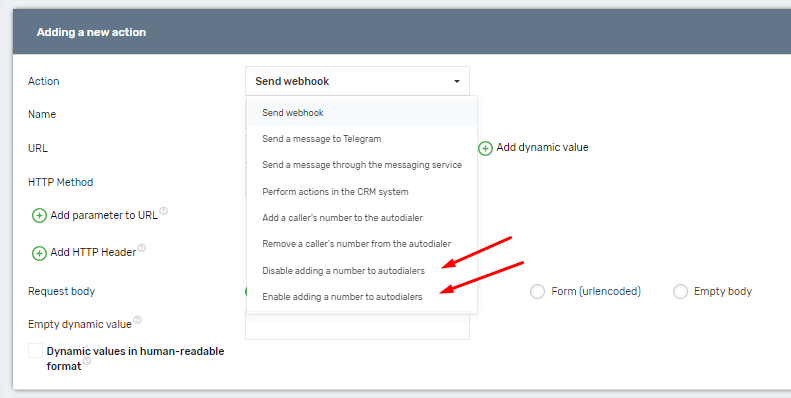
Also, apart from the manual way of adding numbers, there is an option to configure either through an event handler or via API request.
Addition via “Event Handler”:
To add a number via the event handler, we need:
- Add a new event

2. In the new event, depending on the need to select the desired action.
Adding via API request:
More detailed instructions on adding/removing numbers via API can be found at the following link
Description of call number statuses
Total amount of numbers Number of unique numbers added to the call
Numbers processed Number of numbers that have already been dialled and the ceiling dialling date has not yet occurred
Calls completed Number of numbers that have already been processed by the system and there will be no repeated interactions with them
Repeated calls Number of calls made repeatedly based on the setting in the call “Automatically re-call failed calls”
Not processed Number of numbers to which the system will still make calls
In the process of calling Number of active dialogues answered by customers during an autodial call
Answered by subscriber and operator Number of calls answered by the caller, after which the call reached the operator and the operator picked up the handset
Answered by the subscriber and there was no call to the operators Number of calls to which the subscriber answered but ended the call before attempting to connect to the operators
No answer Number of calls to which subscribers did not pick up the receiver
Busy or reset Number of calls that were either rejected by callers or callers were in a call when the call was attempted
Connection failure Number of numbers to which a call was attempted but ended with an error from the service provider
Blocked Number of numbers to which a call was attempted, but these numbers are blocked in the “Project Settings – Block Users” section
Answering machine: The caller is talking Number of numbers recognised by the answering machine: The caller is talking and cannot receive your call.
Answering machine: The caller is unavailable Number of numbers in which the answering machine is recognised: The caller is out of range and cannot receive your call.
Answering machine: Voice mail Number of numbers in which the answering machine is recognised: The person you are calling cannot take your call, leave a message after the beeping tone
Answering machine: The number does not exist Number of numbers recognised by the answering machine: The number you are calling does not exist Check whether the number you are calling is correctly dialled.
Client made the call himself or was an outgoing call Number of numbers indicating the number of numbers that called back to the company themselves, or there was a direct outgoing call by the manager (Manual dialling) ( This only works when auto-dialing is set up, the function is not to call customers who called themselves).
Cancelled Number of numbers that got to this status after pressing “Cancel” in the call or if the call schedule is over and there are still numbers in the “Not Processed” status – these numbers will go from the “Not Processed” status to the “Cancelled” status.
Answered by a subscriber and there were no available operators Number of calls answered by the subscriber(client) but there were no available operators(employees) to connect the subscriber to the operator
Answered by a subscriber and operators did not accept the call Number of calls answered by the subscriber (client) but operators (employees) did not accept the call
Not enough lines This status will include numbers that do not have enough lines on the number used in the call. Also when incorrect conditions for the call are specified in the selected initial scenario
Wrong direction This status will include numbers restricted by the original scenario or billing of the number making the calls of this autodialer
Audio Error This status will include calls where there was an error with Audio playback at the beginning of the call, e.g. the audio was not synthesised before the call (using “Audio Synthesis”)
Cancelled automatically Calls fall into this status due to insufficient funds on the project balance


