Instructions for Setting Up Omni Integration for Bitrix24
What Is Omni-Integration
In traditional integrations, the workflow with the CRM is predetermined. As long as your process fits within it, everything works. Omni-integration is needed when you have something unique, such as your own field, condition, or sequence of actions.
It’s a flexible way to connect your CRM to UniTalk, where you configure the data exchange logic yourself: which entities are involved, including custom ones, what rules to use when searching for a customer, which fields to populate, and which events should trigger actions. If your CRM can send webhooks, the reverse direction works as well. An event in the CRM can trigger an action in UniTalk.
In practice, it’s simple. A “Contact” button appears on the customer’s profile, and phone numbers, email addresses, and chat details are automatically populated in Web Dialer without manual copying.
Flexibility means that the integration will do exactly what you specify, so it’s best to configure it systematically, step by step. That’s exactly how this guide is structured.
How do I set up Omni integration?
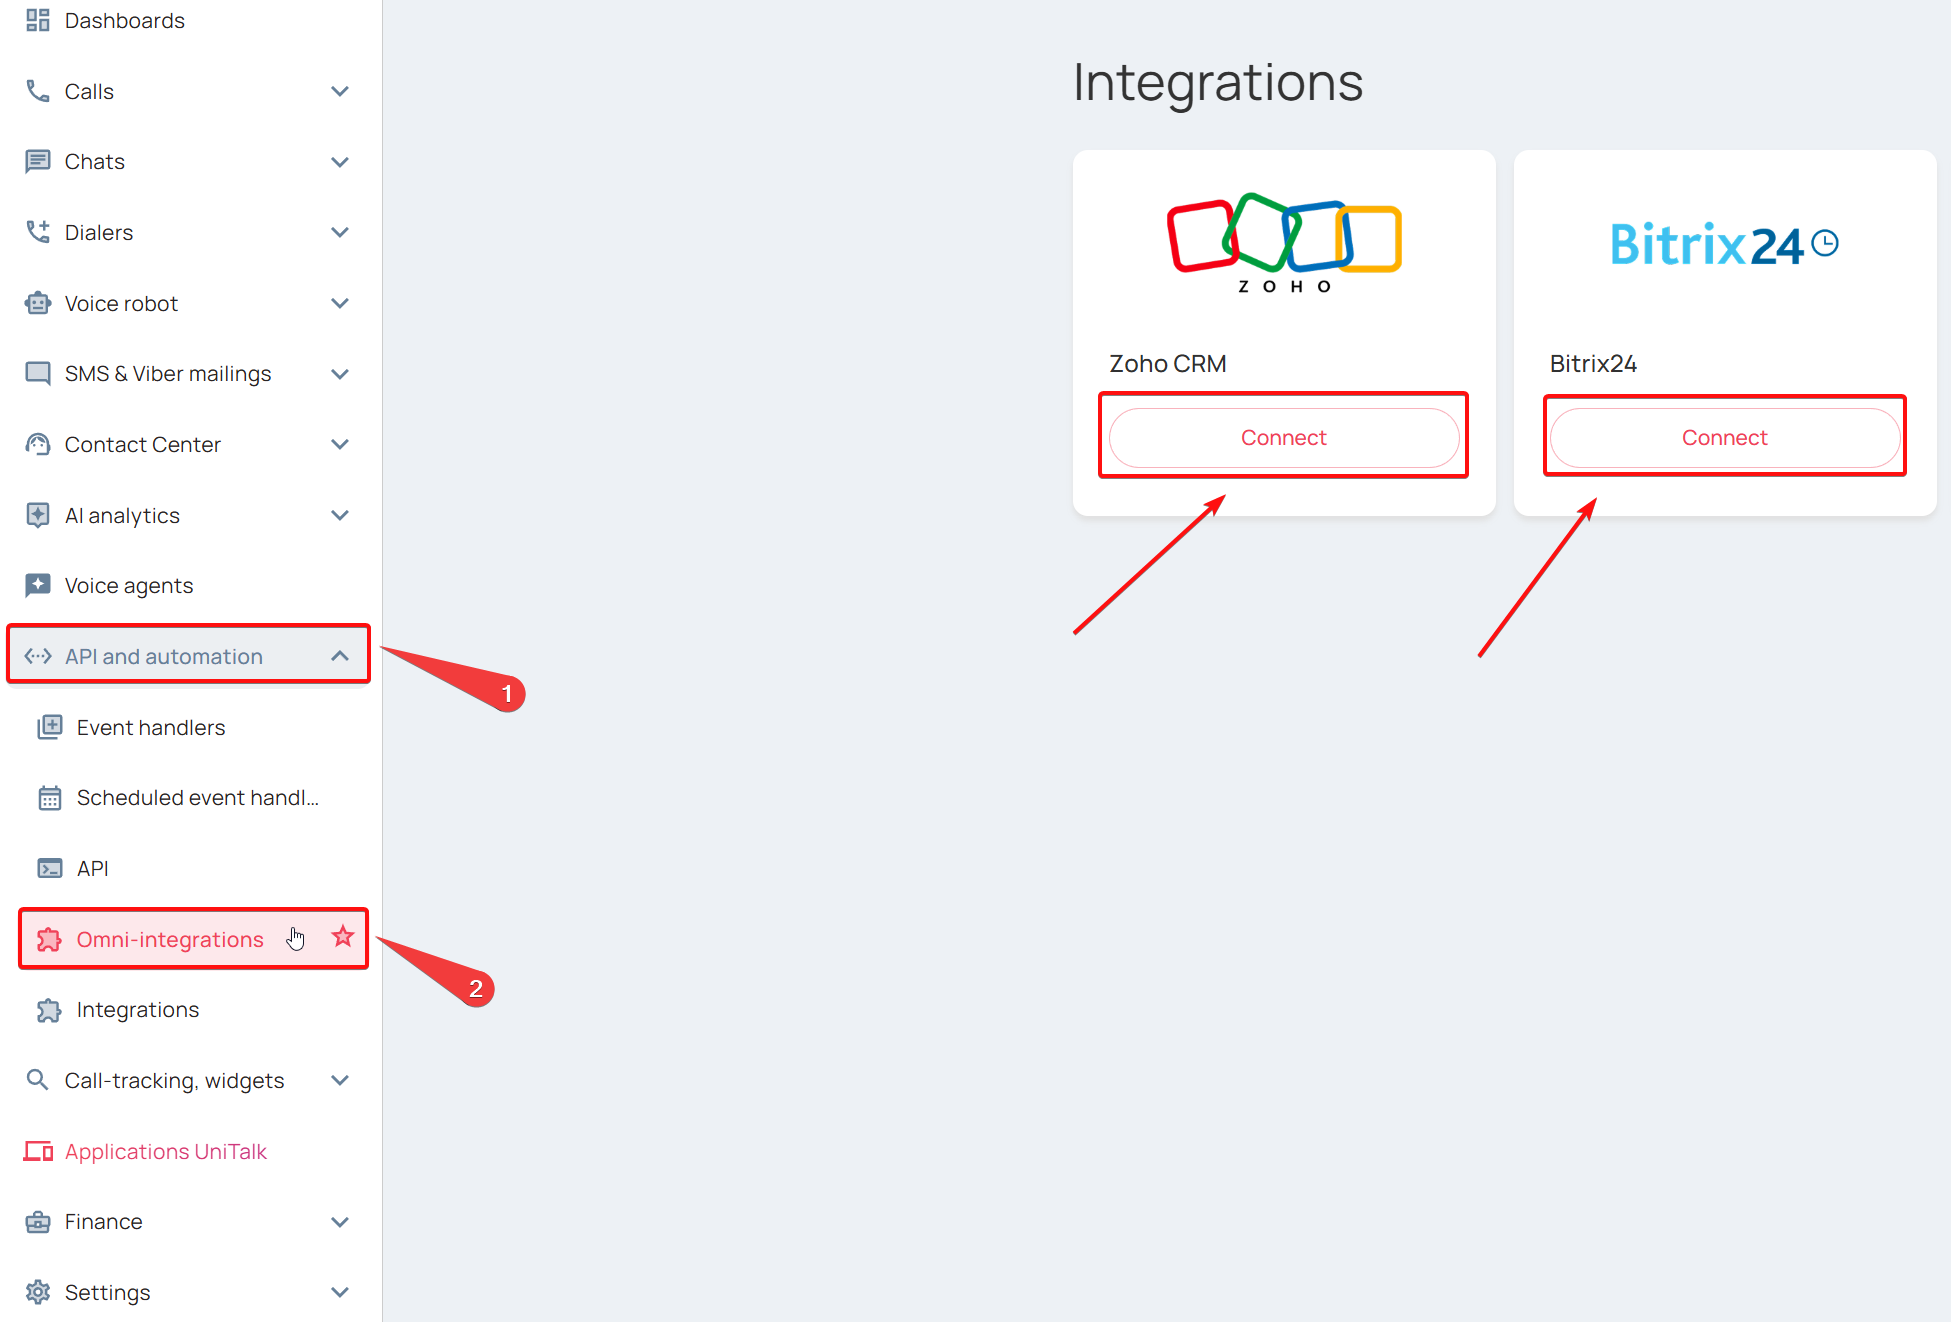
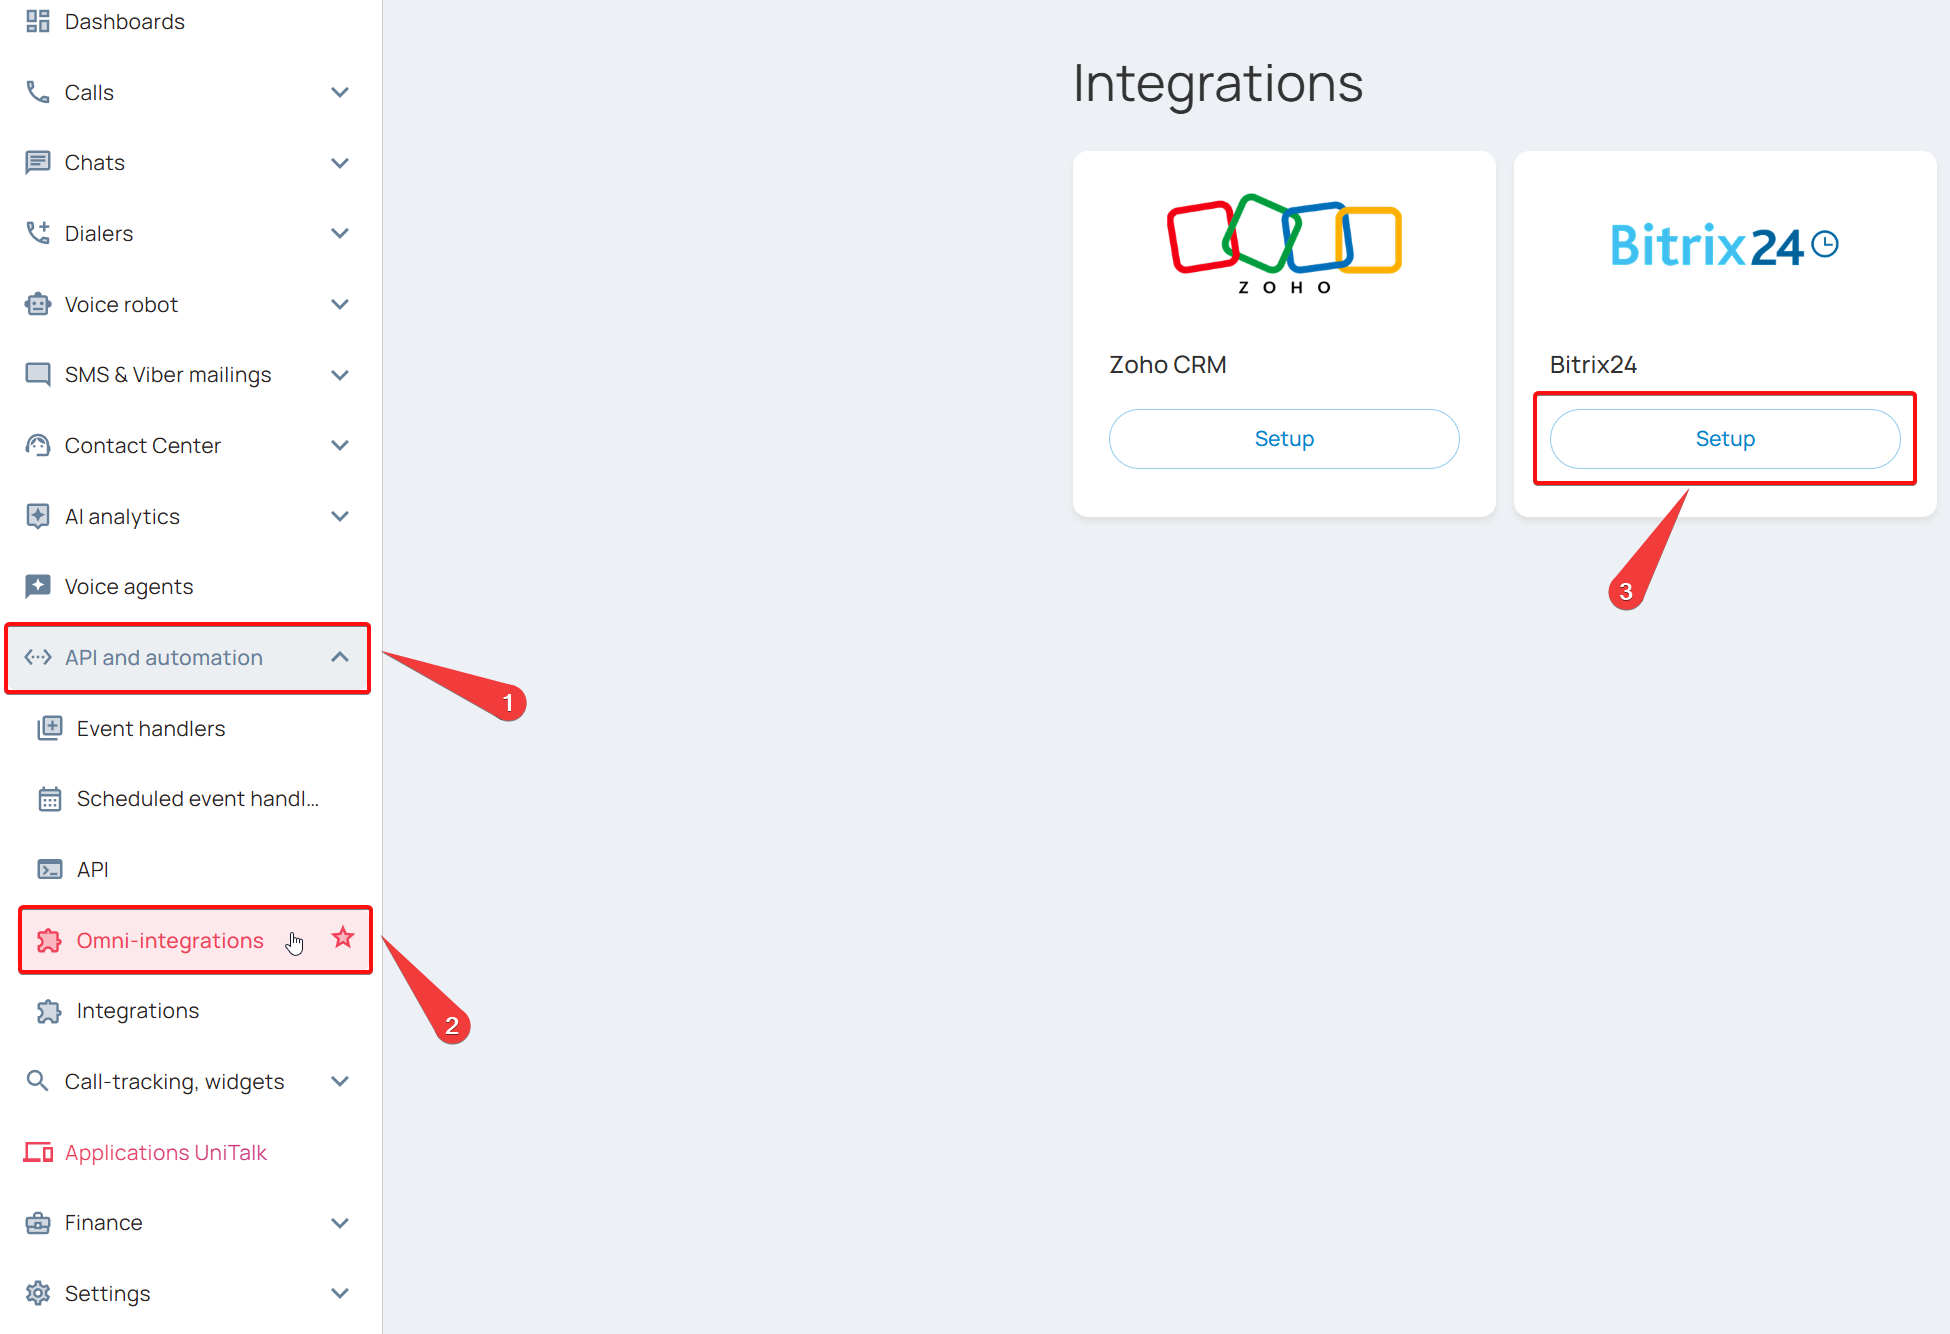
To connect the Omni integration, go to your account dashboard, then to the “API and Automation” section — Omni-integrations
You can also open the page using this link:
https://my.unitalk.cloud/api-automation/omni-integrations
Then click “Connect” next to the integration you want.
Configuring Integration
In this guide, we’ll take a detailed look at how to connect Omni integration with the Bitrix24 CRM system
1. Connection
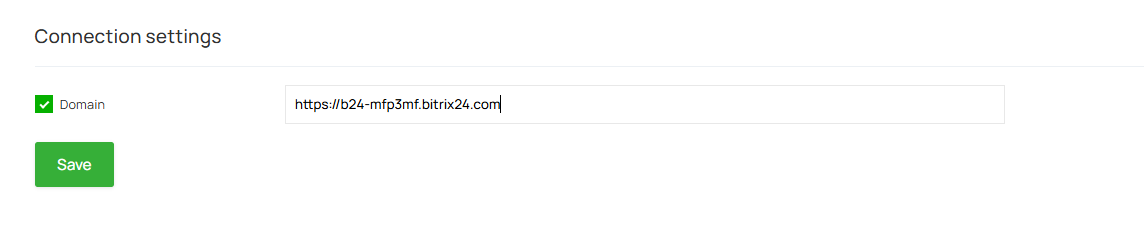
1. Click “Connect to Bitrix24” and, in the connection settings, enter your portal’s address in the following format:
https://your-domain.bitrix24.comhttp://your-domain.bitrix24.com
If you are using the boxed version of Bitrix24 and are having trouble with the SSL certificate, you may use an HTTP address.
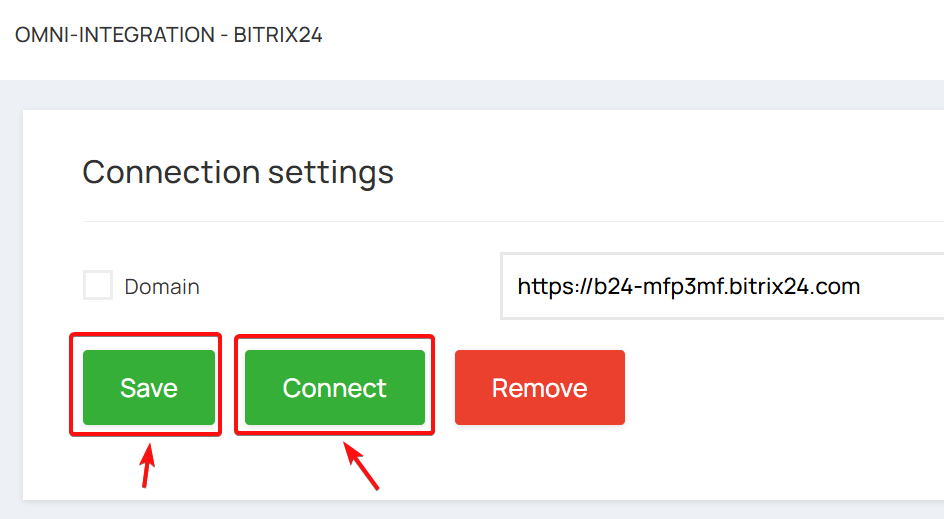
2. Click “Save,” then “Connect” to enable the integration with Bitrix24
3. When you click “Connect,” you will be redirected to the corresponding CRM page to continue the connection process (install the UniTalk app and grant the app the necessary permissions).
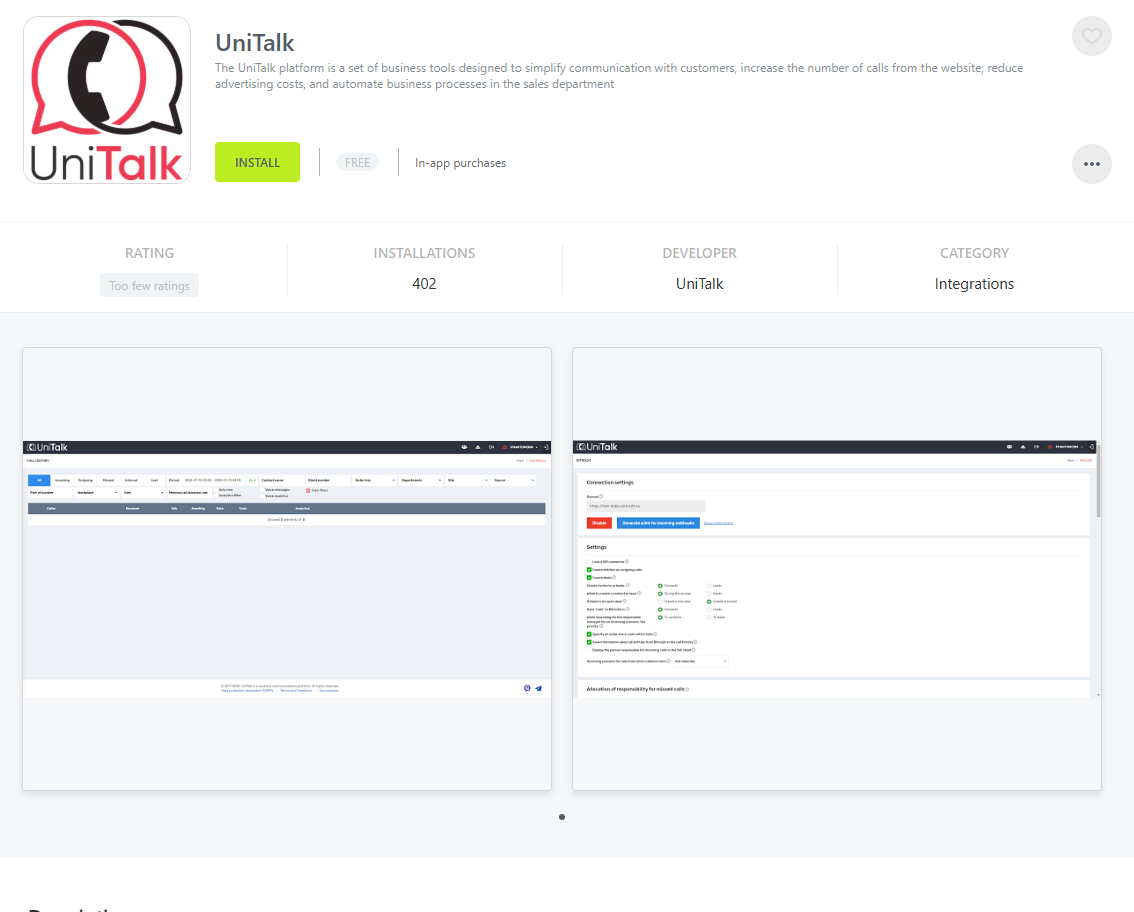
Click the “Install” button
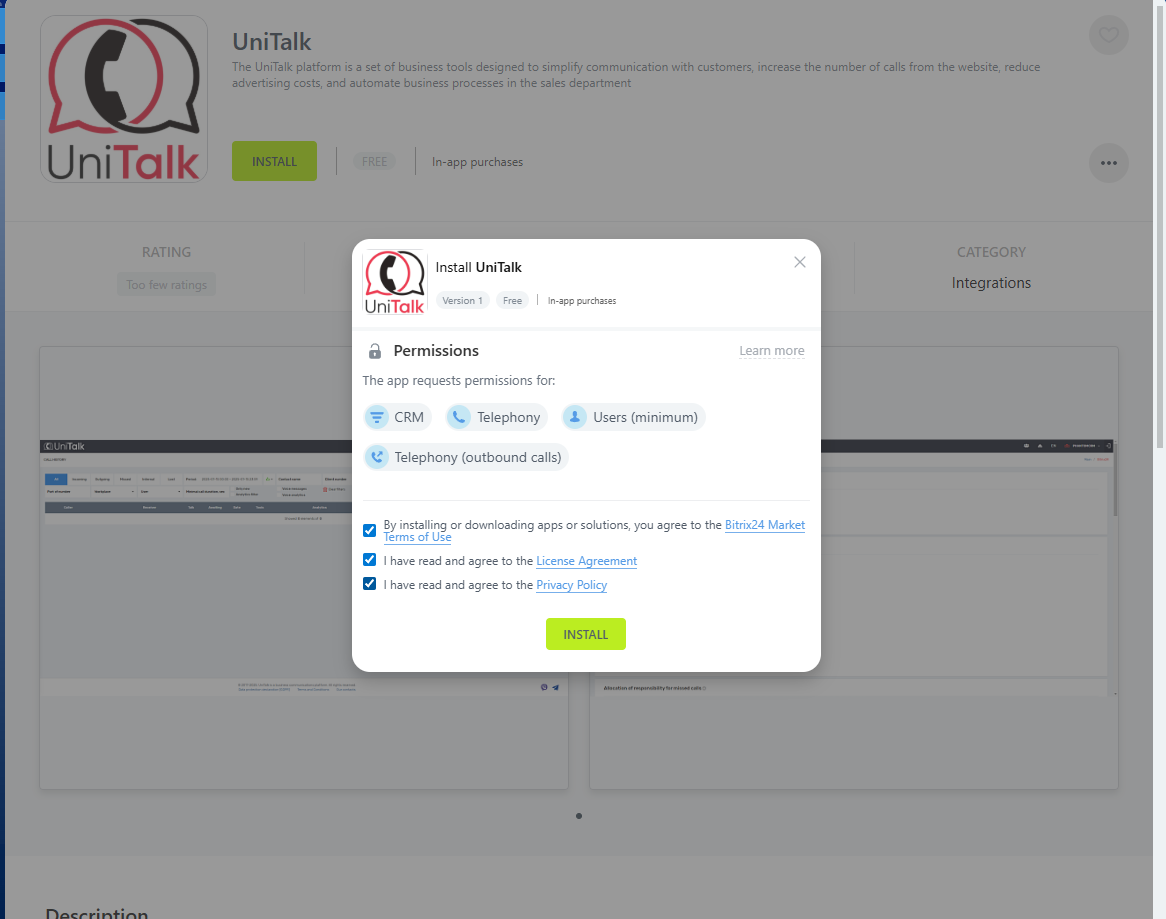
Please review the permissions and check the three corresponding boxes below (to agree to the policy, terms of use, etc.).
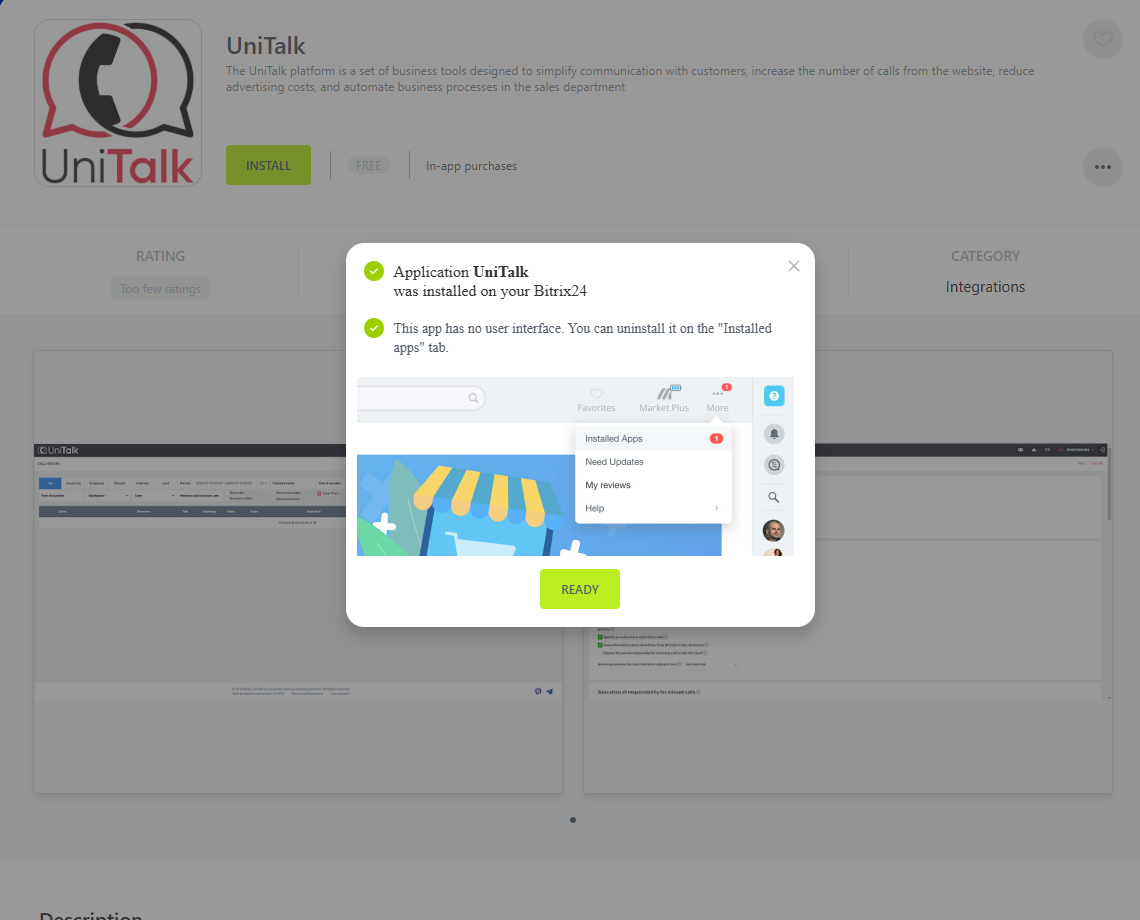
Complete the app installation by clicking the “Ready” button
4.Once you’ve successfully connected, go to your account dashboard and navigate to the Bitrix24 Omni Integration settings at https://my.unitalk.cloud/api-automation/omni-integrations?crm=BITRIX
2. Configuring Integration Entities
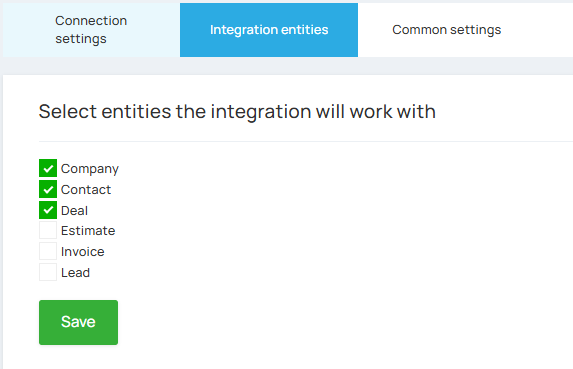
The first tab after the “Connection Settings” section is “Integration Entities”
On this tab, you must select the CRM system entities that the Omni integration will work with. For the selected entities, the integration will be able to search for, create, and update records during operation.
Available Entities for Bitrix24:
The Omni integration supports both standard Bitrix24 entities:
- Leads
- Deals
- Contacts
- Companies
- Quotes
- Invoices
and custom entities.
In Bitrix24, custom entities are implemented as smart processes. If you have created your own smart processes in your CRM, you can also connect them to the integration and use them alongside standard entities to search for, create, and update data.
Important interface rule: On all subsequent tabs in your personal account (in logic settings, action profiles, and dynamic values), only the entities that you have activated at this stage will be displayed.
⚠️ Critical Warning: If you decide to change the list of active entities in the future (add a new one or disable an existing one), the system will automatically set all your configured action profiles, incoming webhooks, and imports to the OFF status for security reasons. This is done to protect your data, as old scripts may no longer function correctly. After changing the list of entities, you will need to go to the settings and re-enable the necessary profiles.
Features of Entities in Bitrix24
When configuring the Omni integration for Bitrix24, it is important to distinguish between the types of available entities
- Core entities: lead, deal, contact, company, quote, invoice.
- Custom entities: In the Bitrix system, these are called smart processes. You can easily create your own unique entity directly within the CRM on the “Smart Process Automation” tab, and integration will be able to work with it seamlessly.
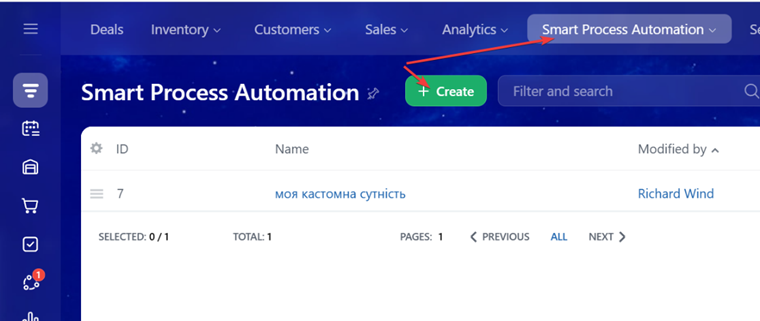
3. Common Settings
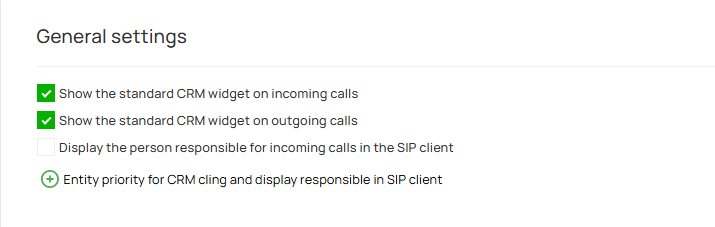
On this tab, you’ll find the basic system control settings. It includes:
- General integration settings: activation and key rules for system interaction.
- General settings for integration entities: the behavior logic of CRM elements being created or updated.
- Agent Assignment: Linking and Mapping Managers Between the UniTalk Dashboard and the CRM.
- Phone number formats for entity searches: Configure the rules that the system will use to correctly search for and identify customers in your database.
Call Visualization in CRM
“Show Standard CRM Widget During Incoming/Outgoing Calls” Feature: If your CRM system’s API allows a standard pop-up window to be displayed during calls and this checkbox is selected, the system will automatically display it to the agent.
Important: If a specific CRM’s API does not support this feature, these two checkboxes simply will not appear in the settings interface.
In Bitrix CRM, this pop-up looks like this:
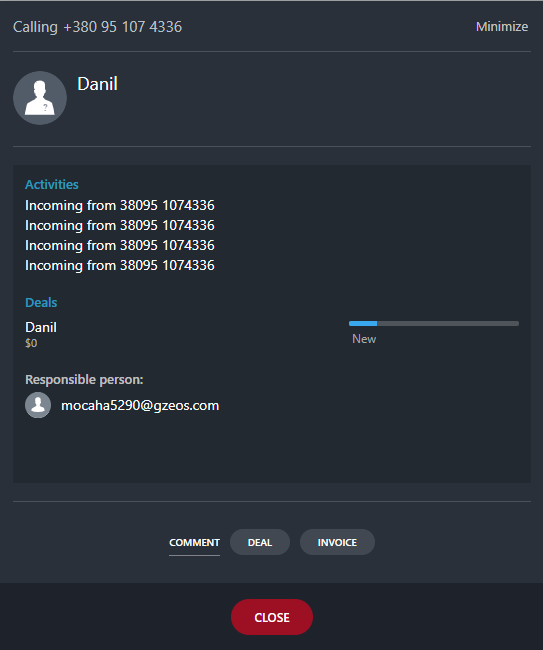
Additional Display Settings in the SIP Client
- “Show Assigned Manager for Incoming Calls in the SIP Client” checkbox: This feature works similarly to the setting with the same name in our older integrations. If enabled, when an agent receives an incoming call, they will see in the SIP client the name of the manager assigned to that client in the CRM.
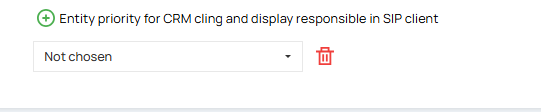
- “Entity Priority for Sticker and Assignee in SIP Client” setting: Clicking this button adds a drop-down menu. In it, you can select one of the entities from your integration that you previously enabled on the second tab.
How Priority Works: The higher up in the list a field containing a selected entity (deal, lead, contact, etc.) appears, the higher its priority is for the system when determining the assigned manager and triggering the “sticky” feature.
3.1. Settings section for each integration entity
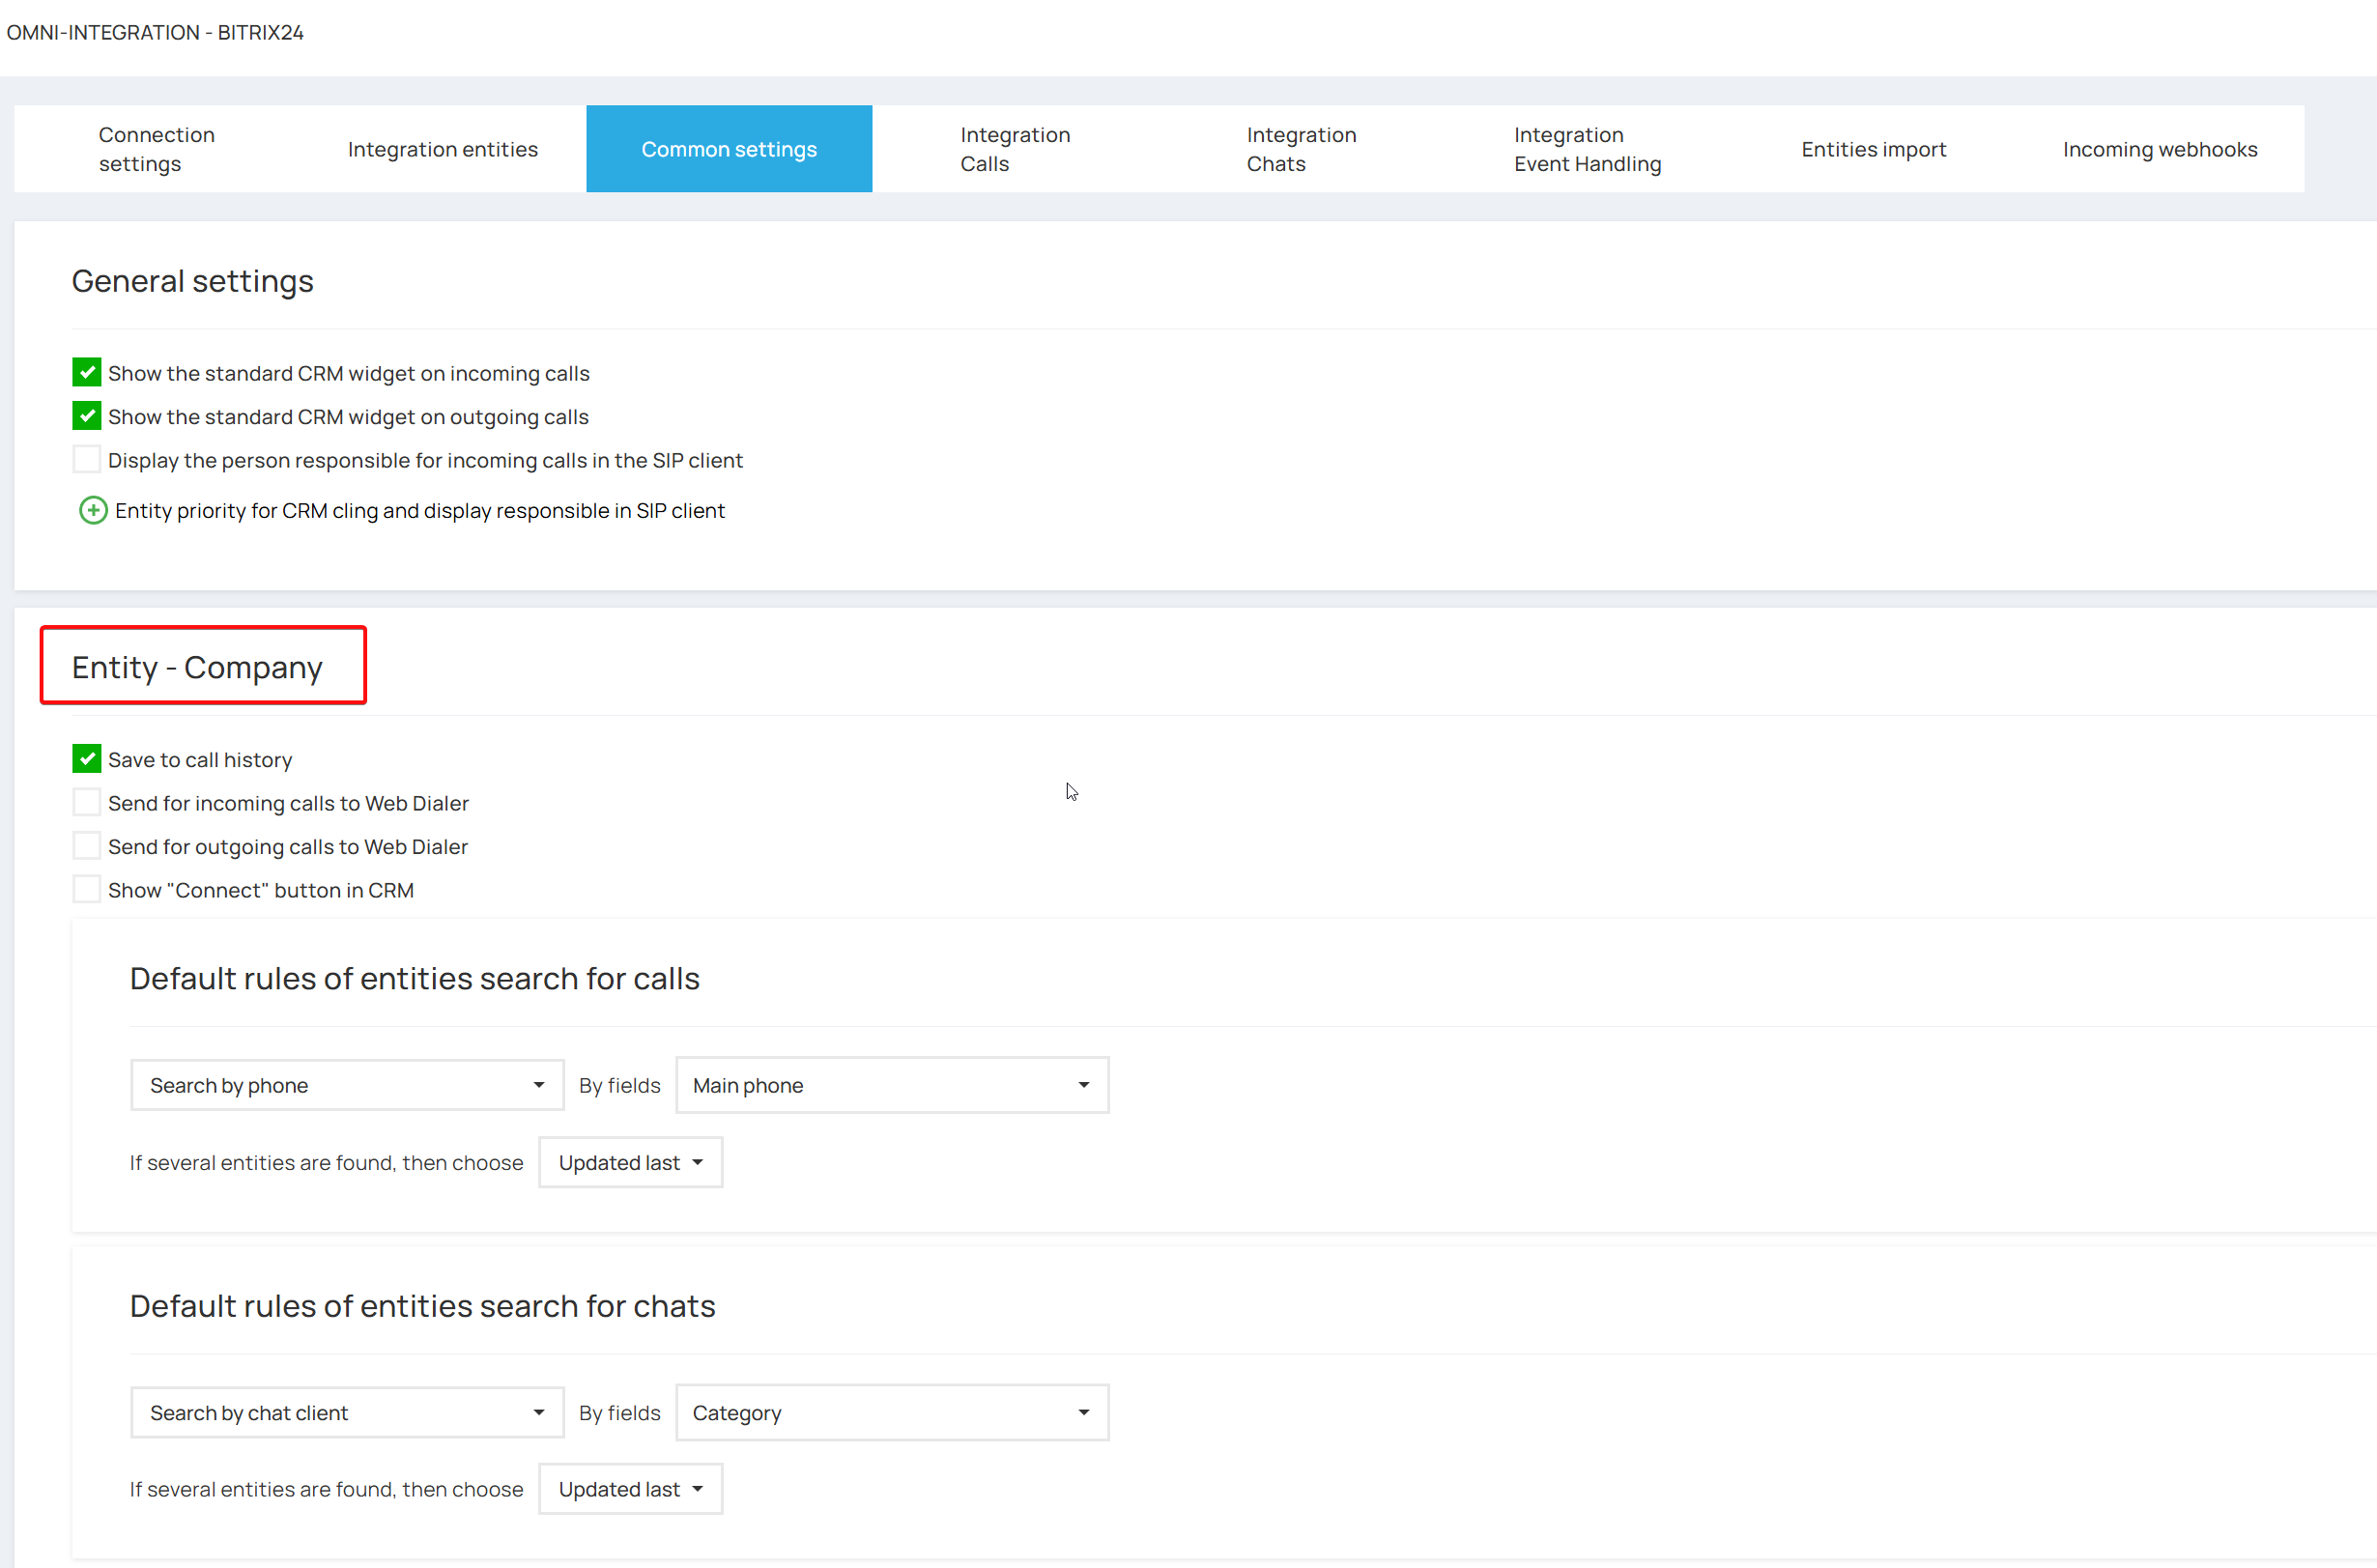
For each individual entity that you have enabled on the “Integration Entities” tab, the system will automatically create a separate control block.
These blocks will be displayed in the format: “Entity — entity_name” (for example: Entity — Contact, Entity — Deal, etc.). Within each of these blocks, you can configure the logic for working with that specific data type in detail.
Call History and Synchronization with Entities
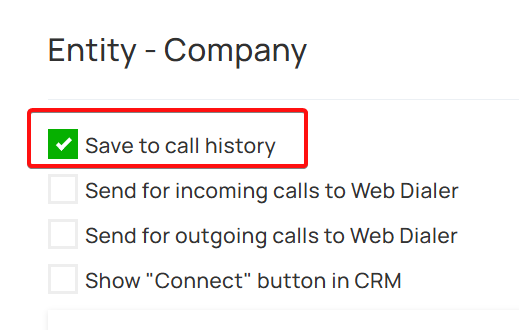
“Save to Call History” checkbox: If this feature is enabled, detailed information about the entity found or created—including its ID, type, the assigned manager’s ID, and name—will be recorded in the details for each call. Afterward, in UniTalk’s “Call History,” a direct link to this entity in the CRM, along with its name and the name of the assigned manager, will appear in the context menu next to the subscriber’s number.
For Bitrix CRM, a detailed search by individual entities has been implemented:
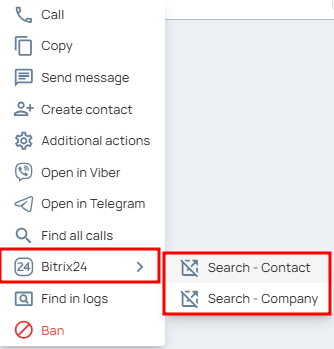
Links for quick entity search will be completely absent from the interface in two cases:
- If your CRM integration is currently completely disabled.
- If a specific entity (such as a lead or a deal) has not been enabled by you previously on the 2nd settings tab
Web Dialer Settings and Features
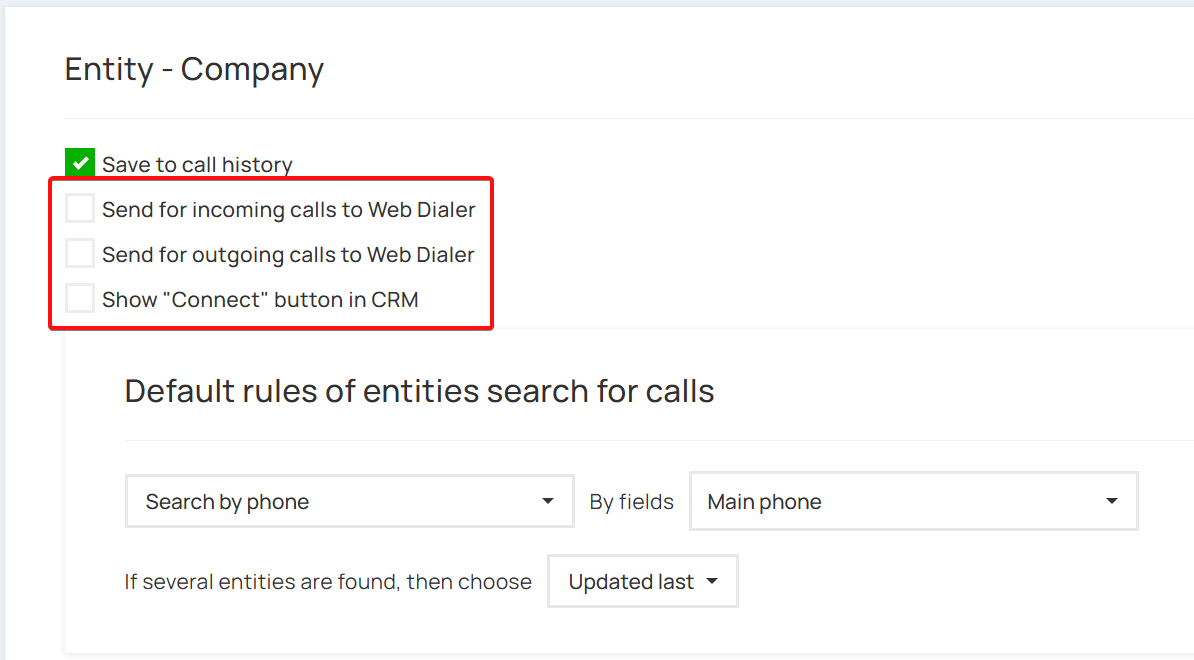
In the settings section for each entity, you’ll find two important options for working with the Web Dialer:
- “Send to Web Dialer for Incoming/Outgoing Calls” checkboxes: If this feature is enabled, the name of the entity found, the name of the assigned manager, and a direct link to that entity in the CRM will be displayed directly in the Web Dialer during calls.
- “Show ‘Contact’ Button in CRM” checkbox: If you check this box, a “Contact” button will appear on the page for a specific entity in the CRM when using the Web Dialer.
How it works: When the “Contact” button is clicked, the system automatically collects all available customer information (phone numbers, email, existing chat ID, or details needed to start a new chat) and sends it to the dialer. This allows the agent to instantly call or message the customer directly from the Web Dialer interface.
This is a modern alternative to the standard “call-on-click” feature in a CRM; it operates reliably, does not require the development of complex and expensive custom CRM widgets, and also allows you to send messages via chat, SMS, and Viber directly through the Web Dialer.
Default rules for searching for entities in calls/chats
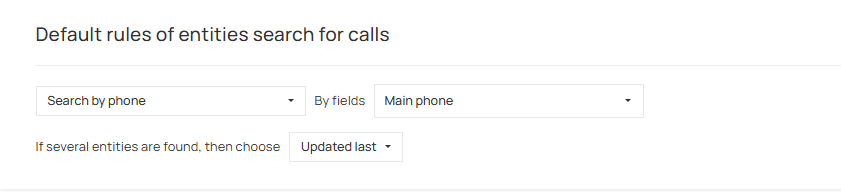
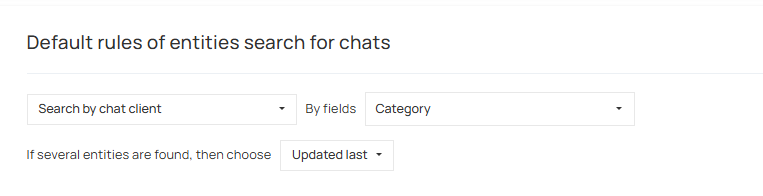
These settings allow you to set default entity search rules separately for chats and separately for calls.
The system automatically applies these rules in the following cases:
- When searching for a dynamic event handling value. If an entity is not found based on the rules specified in the action profiles, the system will perform a search using the default rules. For chat events, the rules for chats will be used; for all other events, the rules for calls will be used.
- To display information in the SIP client. To show the operator the name of the entity found and the assigned manager, the system always uses the default search rules for calls.
- When configuring the “sticky” feature in incoming call scenarios, the default search rules are automatically applied as the base settings.
- When creating new actions or actions that haven’t been configured yet. For chat events, chat rules are automatically applied; in all other cases, call rules are applied.
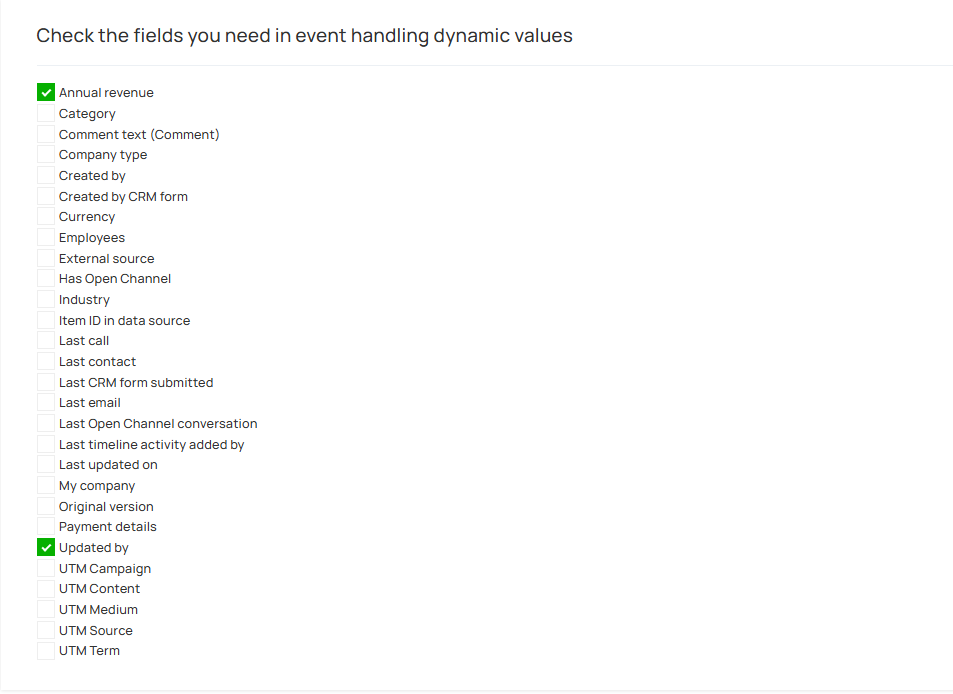
Important to configure at this stage: Check the boxes for the fields you need in the dynamic values for event processing.
Working with CRM fields and selecting dynamic values
CRM entities usually contain many additional or outdated fields that are not used in telephony operations. To ensure the system runs fast and stable, we do not fetch absolutely all fields consecutively when receiving data via API.
The system always automatically retrieves fields that are already tied to the internal logic of the integration — you will not see them in the selection list.
Important configuration rule: All other additional fields that you need for your work must be manually checked. Only after doing this will they appear in the dynamic values for event processing under the Omni integration section.
This is critically important not only for event processing but also for further integration setup on all subsequent tabs, as dynamic values are used there. If a checkbox is not marked here, the required field will simply be unavailable.
Which fields are available by default (without checking the boxes):
- Entity ID
- Entity creation time
- Entity last update time
- Entity owner
- Main text fields: first name, last name, middle name, title, subject (usually available by default, but there may be exceptions depending on the CRM)
- Primary phone
- Primary email
- “All phones” is our system pseudo-field (created automatically in the UniTalk code), where numbers from absolutely all phone fields of the entity are gathered and recorded.
- “All emails” is a similar pseudo-field where email addresses from all fields of the entity are gathered.
- Pipeline
- Link to another entity — a field whose value is the ID of the related element (for example, linking a deal to a contact). It is usually named according to the entity: “Contact”, “Deal”, etc.
- All fields with the “phone” data type
- All fields with the “email” data type
- All fields that are required when creating an entity in the CRM.
Verification hint: If any of the fields listed above is missing from the default dynamic values list, it is most likely either absent in your CRM or the system’s API does not return it during a search. If you have any doubts, you can always contact our support for an additional technical check.
3.2. “Operator Location” Section
Allows linking CRM users, UniTalk users, SIP lines, and operators’ mobile numbers.

Configuring Operator Location
In this section, you configure the connection between managers in your CRM and users in the UniTalk system. The configuration is set up as a table, where each column is responsible for specific data:
- Column 1 (CRM Username): This displays or allows selecting a specific manager from your CRM system.
- Column 2 (UniTalk Users): Select the appropriate UniTalk user from the drop-down list here. The same UniTalk user may be specified no more than once in the table. Restriction: Multi-select, where you can select multiple UniTalk users at once who correspond to this manager.
- Column 3 (SIP Lines): Here, you can also select a specific SIP line from the drop-down list to assign to this user. The same SIP line can be added to the table no more than once. Restriction: Multi-select for choosing SIP lines. You can assign multiple lines to a manager at once.
- Column 4 (Mobile Numbers): An input field for entering operators’ mobile phone numbers. If there are multiple numbers, specify them separated by commas. Restriction: The numbers must be valid GSM numbers. The same phone number can be specified in the table no more than once.
3.3. “Phone number formats for entity search” Section
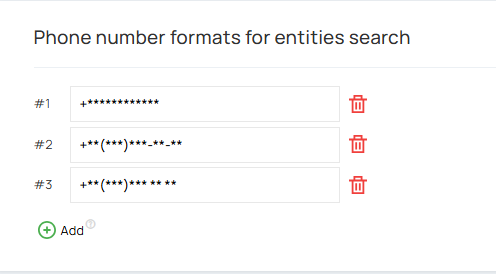
Configuring phone number formats for search
In some CRM systems, searching for entities via API by phone number works in a specific way. Sometimes, the system requires the number to be sent in a wide variety of formats: with or without a plus sign, with or without a country code, or containing parentheses, spaces, or dashes.
If your CRM system is capable of performing high-quality phone number searches on its own without any extra “smoke and mirrors,” this configuration section simply will not be displayed in your dashboard.Important:That is exactly why a flexible format configuration has been added to the Omni integration.
In Bitrix24, the search functionality has its own specific quirks, which is why this configuration is available here. Although you cannot manually enter a phone number with spaces or special characters directly inside the Bitrix24 dashboard when creating an entity, this is frequently done via third-party APIs. As a result, the database in many projects ends up containing contacts with phone numbers saved in non-standard formats.
How templates and asterisk (*) substitution logic work
The template allows the use of single spaces, digits, as well as the characters ,, +, -, (, and ). For example: +38 () ***--.
The logic for substituting digits in place of asterisks (*) works from the end of the phone number to the end of the template.Let’s break down an example step-by-step together, where the template is set to *** ***– and a client is calling from the number 380971234567:
- *** **–67
- *** ***–*7
- *** ***-*5-67
- *** ***-45-67
- *** 3-45-67
- *** *23-45-67
- *** 123-45-67
- 7 123-45-67
- *97 123-45-67
- 097 123-45-67
- This completes the process. The template is fully filled with digits, and the remainder of the number (38) is simply discarded by the system.
What happens if there are more asterisks than digits? If your template has more * characters than there are actual digits in the phone number, all extra asterisks will simply be removed by the system during substitution. For example, if the template consists of 15 asterisks *************** and the incoming number contains only 10 digits (0123456789), after the template substitution it will remain just the clean number 0123456789.
4. Action Profiles

Configuring Action Profiles
Action Profiles are the heart of automation in Omni integrations. They determine exactly how the system searches for entities in the CRM, what it does with them after the search, what
rules are used to fill in the fields, and how the default schedule for responsible managers is distributed.
Action profiles are managed on the following three tabs:
- Call Integration
- Chat Integration
- Event Handling Integration
4.1. “Calls” and “Chats” Tabs (Standard Events)
In terms of logic, these tabs are similar to the settings in our legacy integrations, but they offer significantly more control. This is where you define action profiles for core system events.
The following events are available for chats:
- Chat started
- Chat ended
- Chat field update (the logic for chats works exactly the same as before — you simply specify an action for each event).
The following events are available for calls:
- Incoming call — started
- Incoming call — answered
- Incoming call — ended
- Outgoing call — started
- Outgoing call — answered
- Outgoing call — ended
- Scheduled C2C (Click-to-Call) call
Important differences in call logic compared to legacy integrations:
- Click-to-Call (C2C) Calls: Previously, when a C2C call was scheduled, entities were created automatically and a standard comment was added to them. In Omni integrations, there are no automatic actions — now you can configure the exact event chain you need with total flexibility.
- Event Separation: Previously, all 6 call events were combined into a single general algorithm, and entities for outgoing calls were created only if a single global checkbox was enabled. The legacy logic triggered only once per call (at the moment of answer, or if unanswered, at the moment of termination).
- Flexibility and Configuration Safety: Technically, the new integration allows you to configure entity creation for every single event (twice for an incoming call and three times for an outgoing one). However, we strongly recommend against doing this to avoid chaos and potential errors in your CRM
💡 How to configure calls “the right way”? To ensure stable system performance (roughly matching the behavior of legacy integrations), set up your action profiles as follows:
- For call answer events, add a condition so that the profile executes only if the call was answered.
- For call completion events, add a condition so that the profile executes only if the call was unanswered.
4.2. “Event Handling Integration” Tab (Custom Profiles)
This tab is designed for custom automation scenarios. Using the “Add” button, you can create any number of your own action profiles and give them clear, recognizable names.
Important rule: Profiles from this tab can be used exclusively in general UniTalk event handlers by selecting the action type “Execute actions via Omni-integration”
Tip: In general event handlers, you can also trigger profiles from the “Calls” or “Chats” tabs — in the selection list, the system event name (e.g., “Incoming call — answered”) will be displayed instead of a custom name.
Available dynamic values on the tabs
To keep the interface clean and avoid overwhelming you, each tab displays its own relevant set of dynamic values. We have removed most fields that do not apply to the current event and would definitely remain empty.”Event Handling” Tab: Absolutely all dynamic values are available, except for the “Omni-integration — Authorization Data” block and legacy values from the “CRM” category”Chats” Tab: Values are available from the following sections: “Miscellaneous”, “Chat”, “Analytics” (standard), “Omni-integration”, “UniTalk Contact Book”, “Call exists in call history”, “First call data”, “Last call data”.”Calls” Tab: Field filtering on this tab is highly precise and specifically tailored to each event:
- C2C Order Event: “Miscellaneous”, “Click to call”, “Analytics”, “Omni-integration”, “UniTalk Contact Book”, “Call exists in call history”, “First call data”, “Last call data”.
- Outgoing Call Events: “Miscellaneous”, “Call”, “Omni-integration”, “UniTalk Contact Book”, “Call exists in call history”, “First call data”, “Last call data”.
- Incoming Call Events: The broadest set of values, including: “Miscellaneous”, “Call”, “Click to call”, “Analytics”, “Omni-integration”, “IVR”, “Auto-dial”, “Auto-dial number data”, “Voice robot”, “UniTalk Contact Book”, “Call exists in call history”, “First call data”, “Last call data”.
Please note: This separation filters out unnecessary fields, but not 100% of the time. For example, at the start of a call, you will still see the “call duration” field, even though it is only populated when the call ends. This is currently how the system operates — it is a baseline format that fully serves its purpose and will be improved in the future if needed.
4.3. Statuses and Display of Action Profiles
To help you easily monitor the system, each action profile has its own clear marker. The display of names and statuses depends on the selected tab:
“Calls” and “Chats” Tabs
On these tabs, you always see the complete list of all available standard events. The profile name here always matches the name of the event itself (for example, “Incoming call — answered”).
Right after the name, one of three statuses is displayed:
- Not configured — you have not yet defined rules and logic for this action profile
- ON — the profile is fully configured, active, and successfully executing the specified actions.
- OFF — the profile is configured but temporarily disabled by the user (all specified actions for this event will not be executed).
“Event Handling” Tab
Since you create your own custom automation scenarios on this tab, the display logic is slightly different:
- Instead of a system event, this tab always displays the custom profile name you specified when creating it.
- A profile can only have two statuses — ON (active) or OFF (deactivated). There is no “Not configured” status here, as every manually created profile already contains a specific set of logic.
5. Entity Import
This section is used to import entities from your CRM, filter them based on specific entity field conditions, and execute an event handler for the fields that match those conditions.
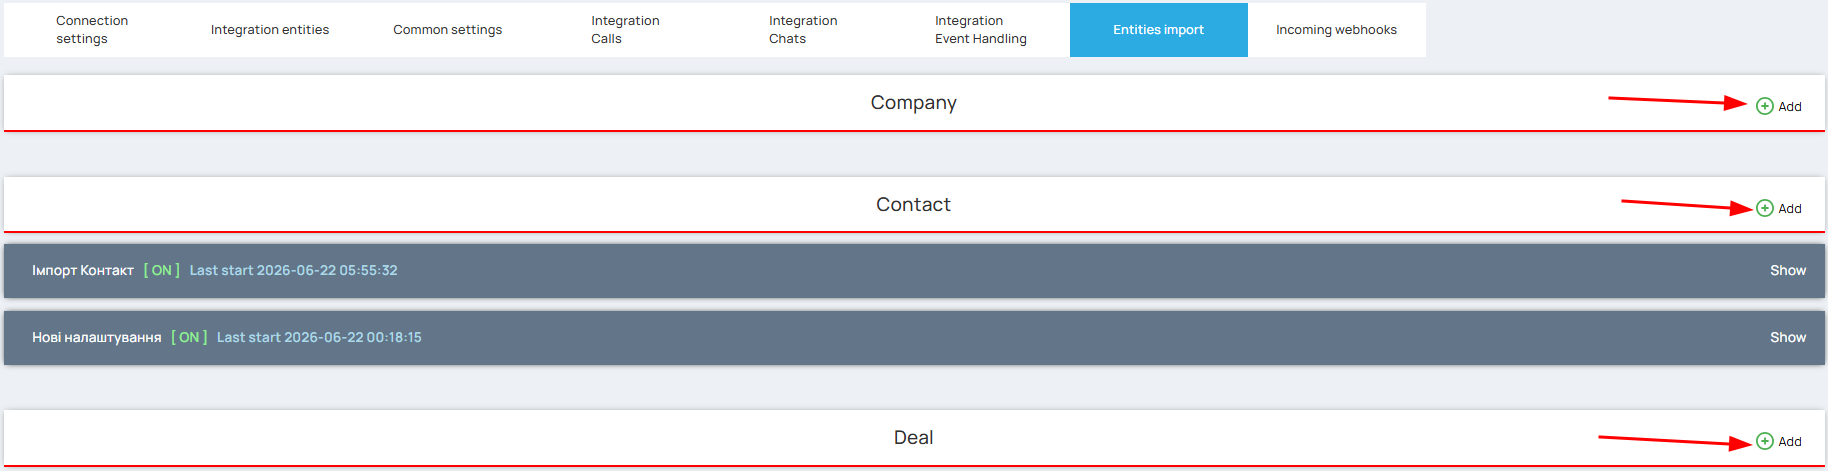
However, there is a limitation: a project can only run 1 active import simultaneously for each entity type. Consequently, imports with automated launching are handled sequentially. Before running, they are sorted by the date of their last execution, and the launch initialization triggers starting from the oldest one:
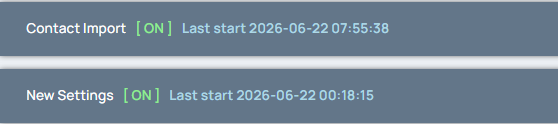
Regarding the settings:
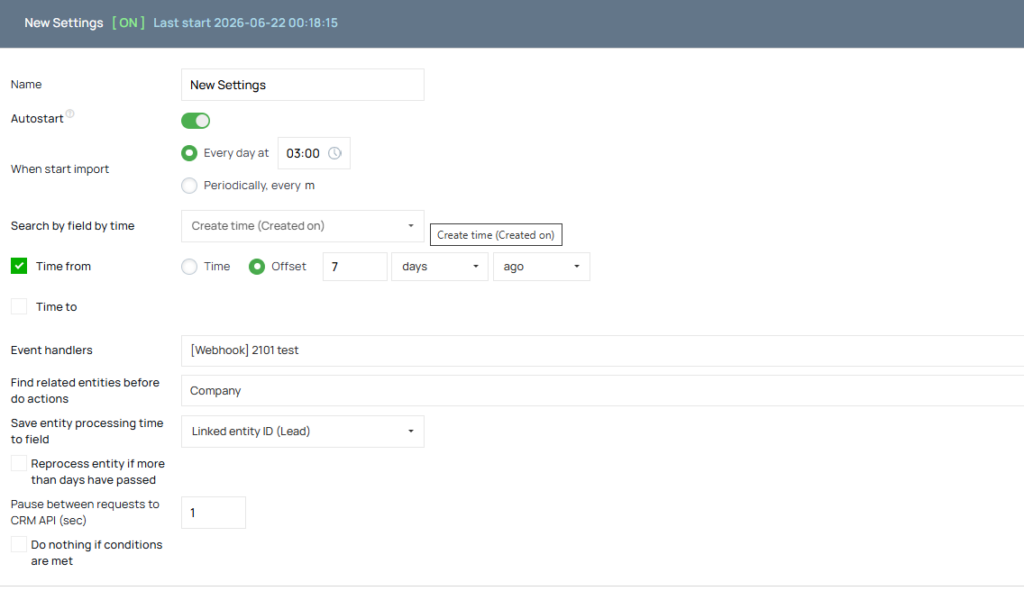
- Name — the profile name
- “Auto-launch” toggle for import — when enabled, the import will run automatically according to the “When to launch” settings. This toggle is displayed only after the settings are saved.
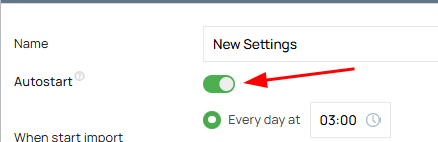
“When to launch import” — specifies exactly when the import should run automatically. Two options are available:
- Set a specific time: The import runs automatically every day at the designated time (e.g., useful for sending phone numbers to an auto-dial campaign).
- Set a time interval (in minutes): The import runs periodically based on the time elapsed since the last launch. For example, this can be used for funnel routing: if the funnel value is 1 or 2, add the number to Auto-dial 1; if the funnel value is 3, add the number to Auto-dial 2.
⚠️ Note: Since only one import can be active (processing data) at any given time, this interval cannot guarantee a strict execution time. If another import profile is currently running, the scheduled import will wait in line and may start later than expected (e.g., after 20 or 25 minutes instead of the configured 15 minutes).
Search by time field — filters and retrieves entities exclusively based on fields that have a “Date and Time” data type.
Time from / Time to — the time range used for the entity search. You can optionally set one or both boundaries. This can be configured as a specific timestamp or as a relative time offset (e.g., within the last 24 hours).
Event Handlers — allows you to select up to 10 event handlers that will be triggered downstream.
Find related entities before executing actions — enables fetching related data during the import process. For example, when importing a deal, this allows you to simultaneously retrieve the phone number stored within the associated contact.
Save entity processing time to field — allows you to log the exact timestamp when the entity was sent to the event handler (note: this records the dispatch time, not the completion time) into any chosen field.
Reprocess entity if more than N days have passed — if the timestamp recorded in the field mentioned above is older than N days, the entity becomes eligible for reprocessing.
Pause between CRM API requests (sec) — a mandatory delay between API calls, ranging from 1 to 15 seconds.
Do nothing if conditions are met — filters based on entity fields to exclude specific records from being processed.
Manual Execution and Processing Logic
Once you save the import settings, a “Start Import” button will appear, allowing you to trigger the process manually right away. The import operates based on the following workflow:
- Data Retrieval: The system fetches entities from the CRM based on the time-field filters, pulling 50 entities per single API request.
- Queue Processing: Each retrieved entity is processed sequentially in a queue:
- The system checks if a timestamp is already recorded in the “Processing time” field.
- If a timestamp exists, and the “Reprocess entity if more than N days have passed” option is either not configured or the specified number of days has not yet elapsed, the entity is skipped (no action is taken).
6. Incoming Webhooks
On this tab, you can configure the processing of incoming webhooks using event handlers. Handling can be set up for each entity type, depending on what you selected in the “Integration Entities” section.
The incoming webhooks in this section differ from those used in some older integrations:
- Old System: The webhook passed a phone number. The system used that number to look up a contact or lead and, depending on the scenario, added or removed that number from an auto-dial campaign.
- New System: Each webhook is strictly tied to a specific entity. Therefore, your CRM must pass the ID of the relevant entity within the webhook payload. For example, if a webhook is configured within the deals section, it must pass the exact Deal ID.
The system performs the lookup based on this ID. If needed, it can also automatically locate related entities and include them in subsequent processing steps.
6.1. Webhook Requirements
The webhook must be sent using the GET or POST method. If necessary, support for other HTTP methods can be added; however, there is currently no requirement for this.
The request must pass the entity identifier. It can be located:
- in the URL parameters;
- in the request body in JSON format;
- in the request body in
form-dataorx-www-form-urlencodedformat
The identifier must be passed in a parameter named id or entityId. The character case is insensitive, so variants like ID, EntityId, ENTITYID, and similar are all considered valid.
If a specific CRM does not allow the use of these parameter names, support for additional parameter names can be added to the code.
For integration with Bitrix24, the system also looks for the data[FIELDS][ID] parameter, as this is the exact format Bitrix24 uses to pass the entity identifier in object creation webhooks, and modifying this parameter name is not possible.
⚠️ Note: Passing data to the event handler does not guarantee that an action will be executed. The decision to perform a specific action is made directly within the event handling logic itself.

To create a profile, click the “+” button on the panel of the required entity. Next, in the “Event Handlers” section, select the handler or handlers that should trigger upon receiving an incoming request from the CRM. There is no limit on the number of selected handlers.
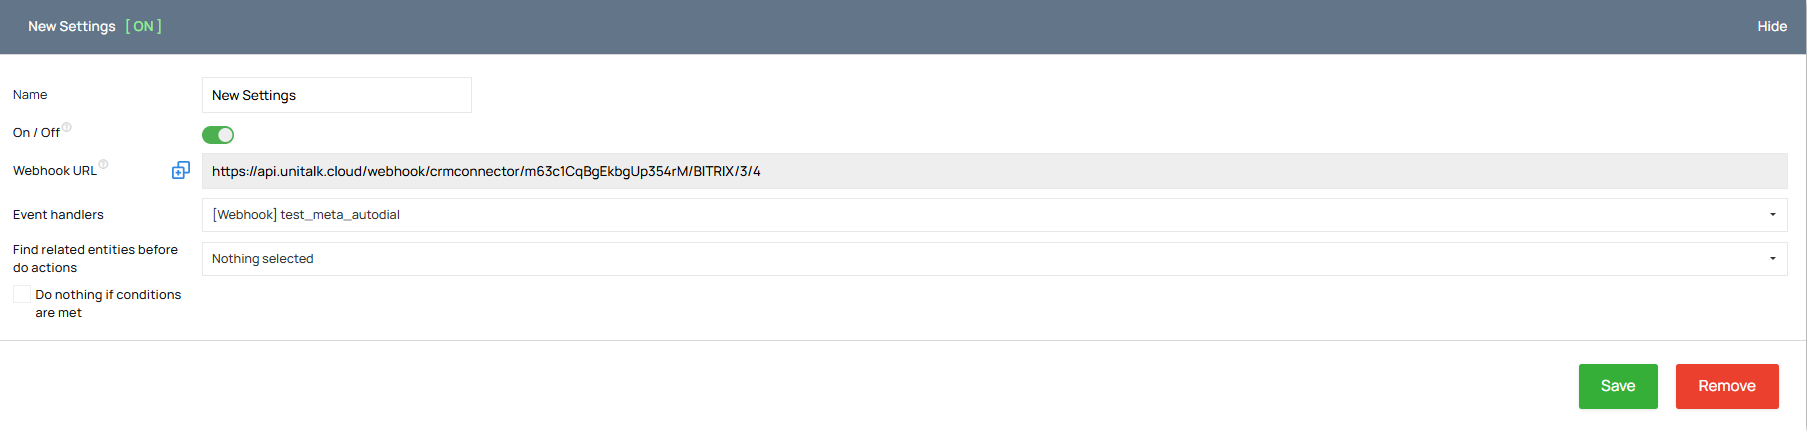
The “Find related entities before executing actions” option allows you to specify an additional entity whose fields will be checked against your conditions before the event handler is triggered.
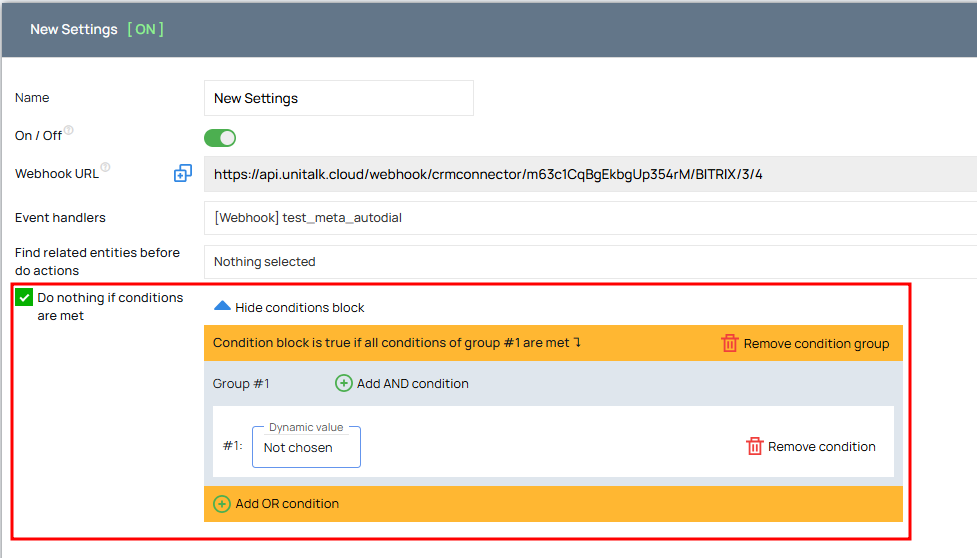
The “Do nothing if conditions are met” feature allows you to configure specific conditions that, when satisfied, will prevent this event processing profile from triggering.
After configuring your settings, click the “Save” button. Once the profile is created, a “Webhook URL” link will appear, which you can then copy and paste into the “Developers” or webhook settings section on the CRM side.
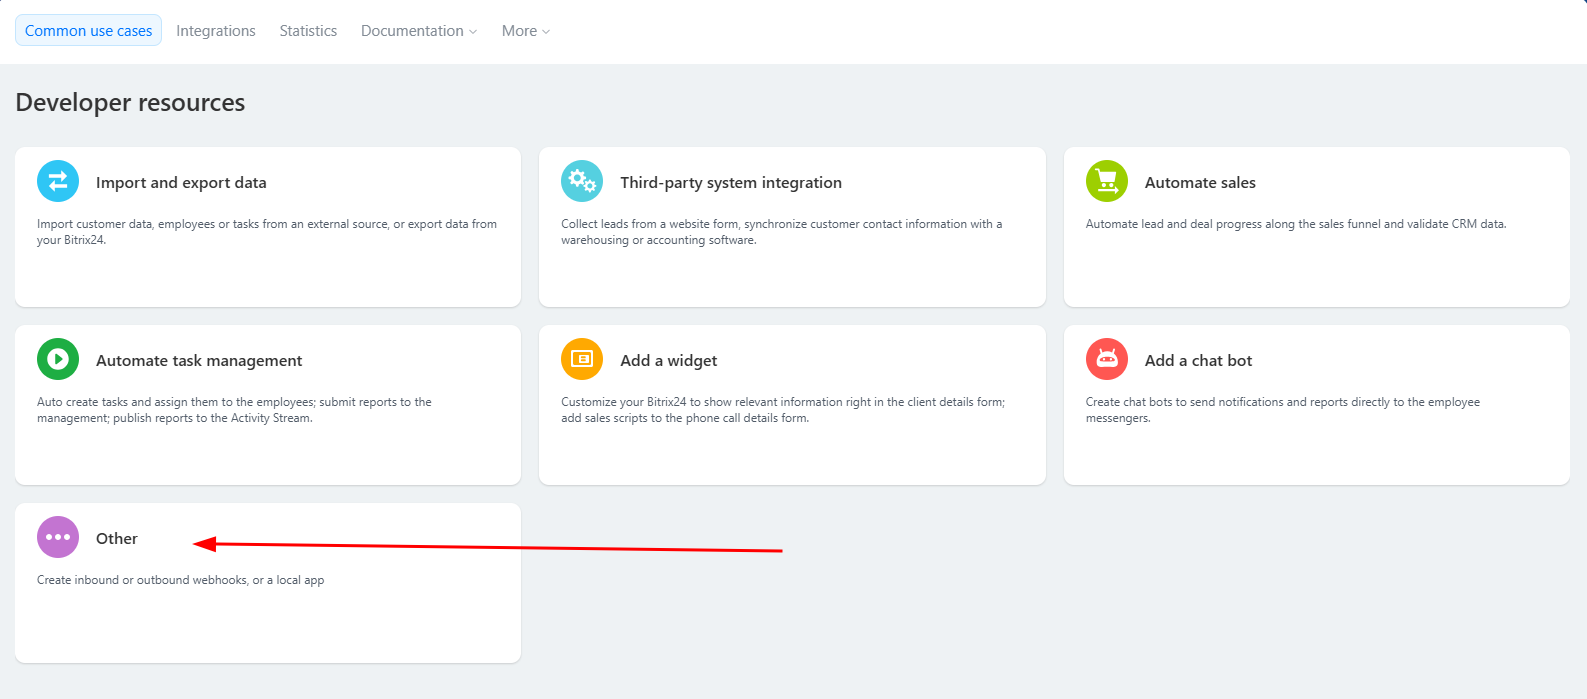
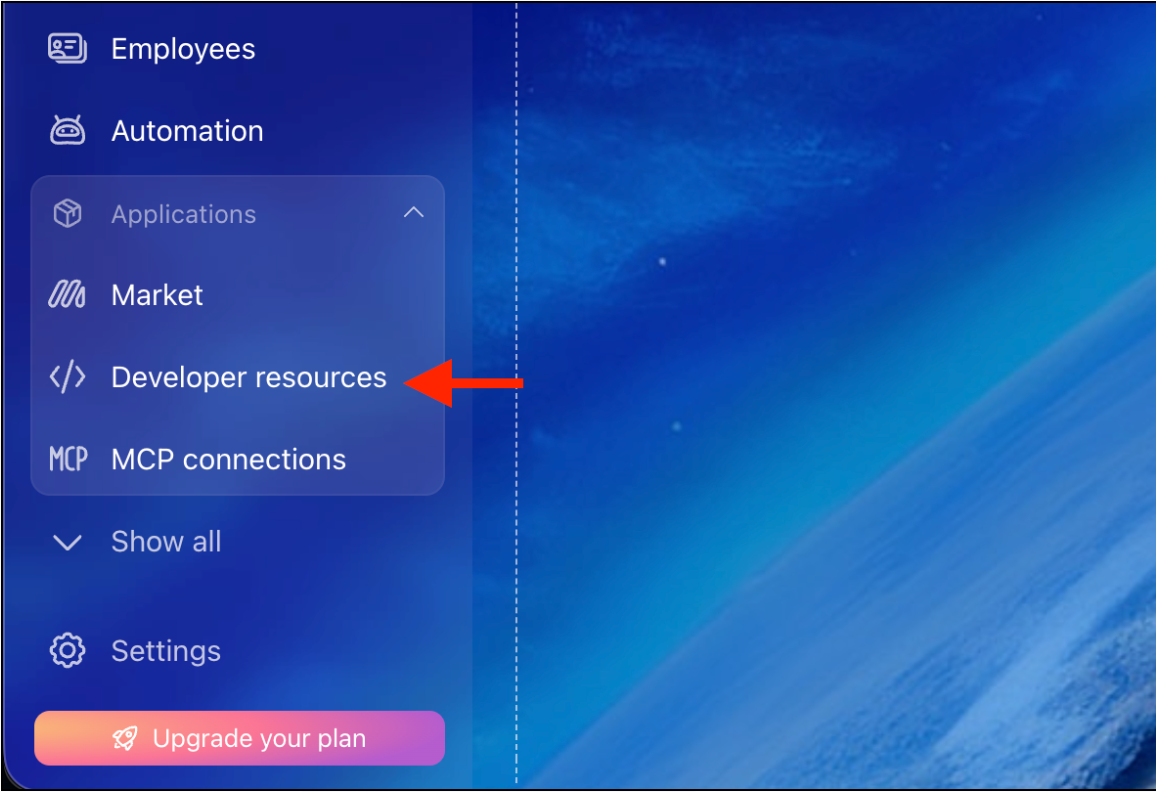
Go to “Automation” -> “Developer resources”
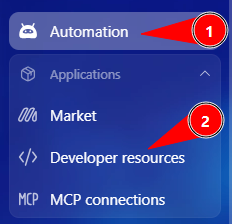
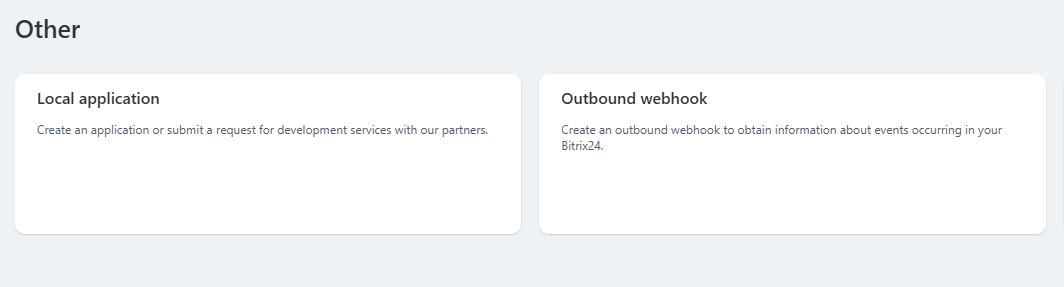
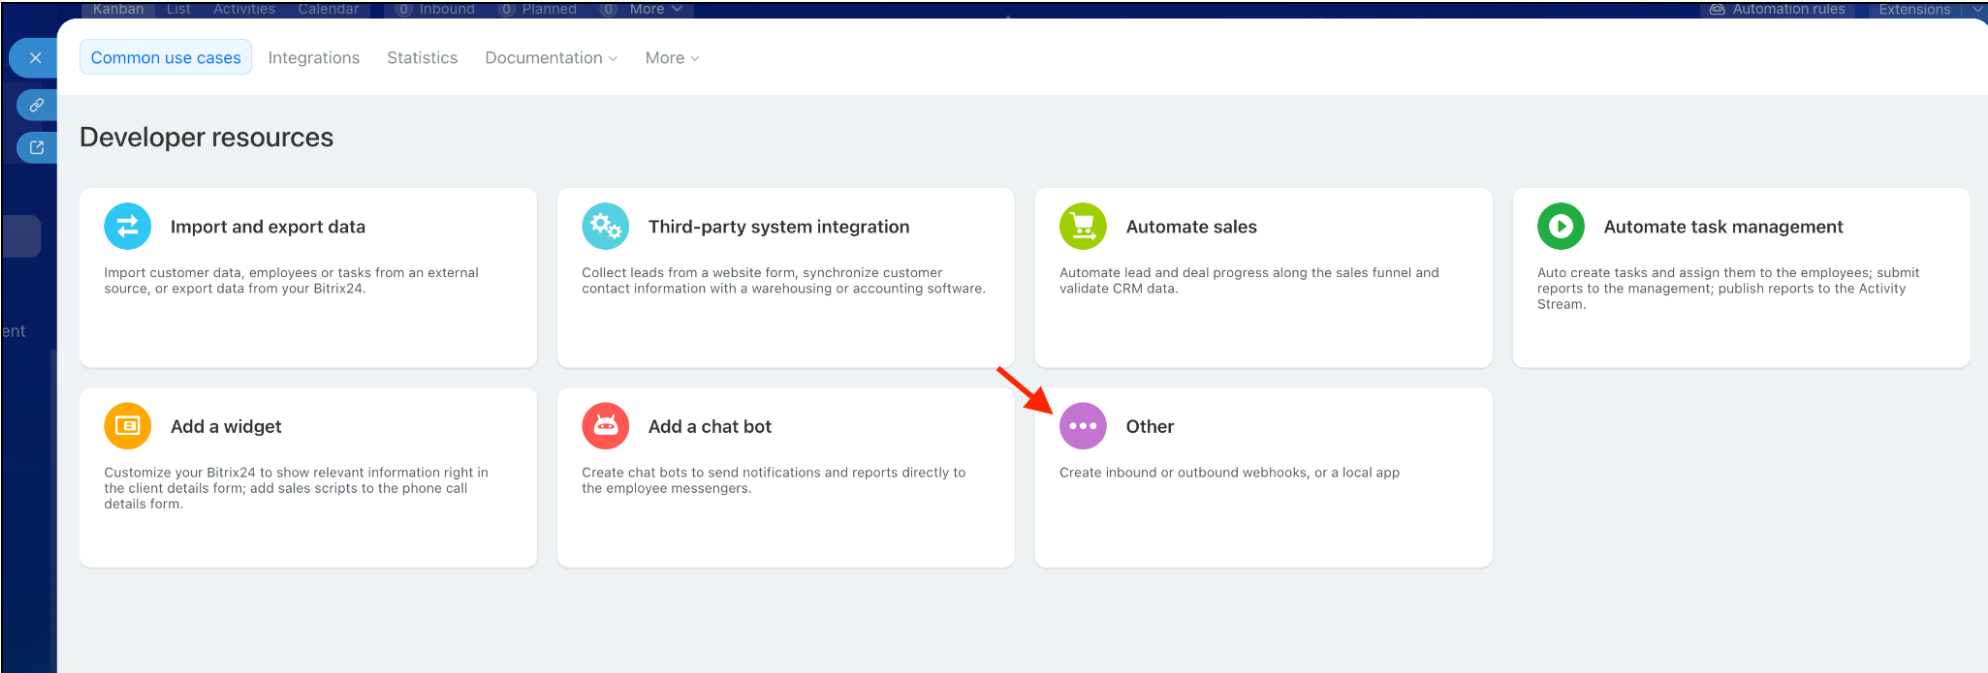
Go to “Other”
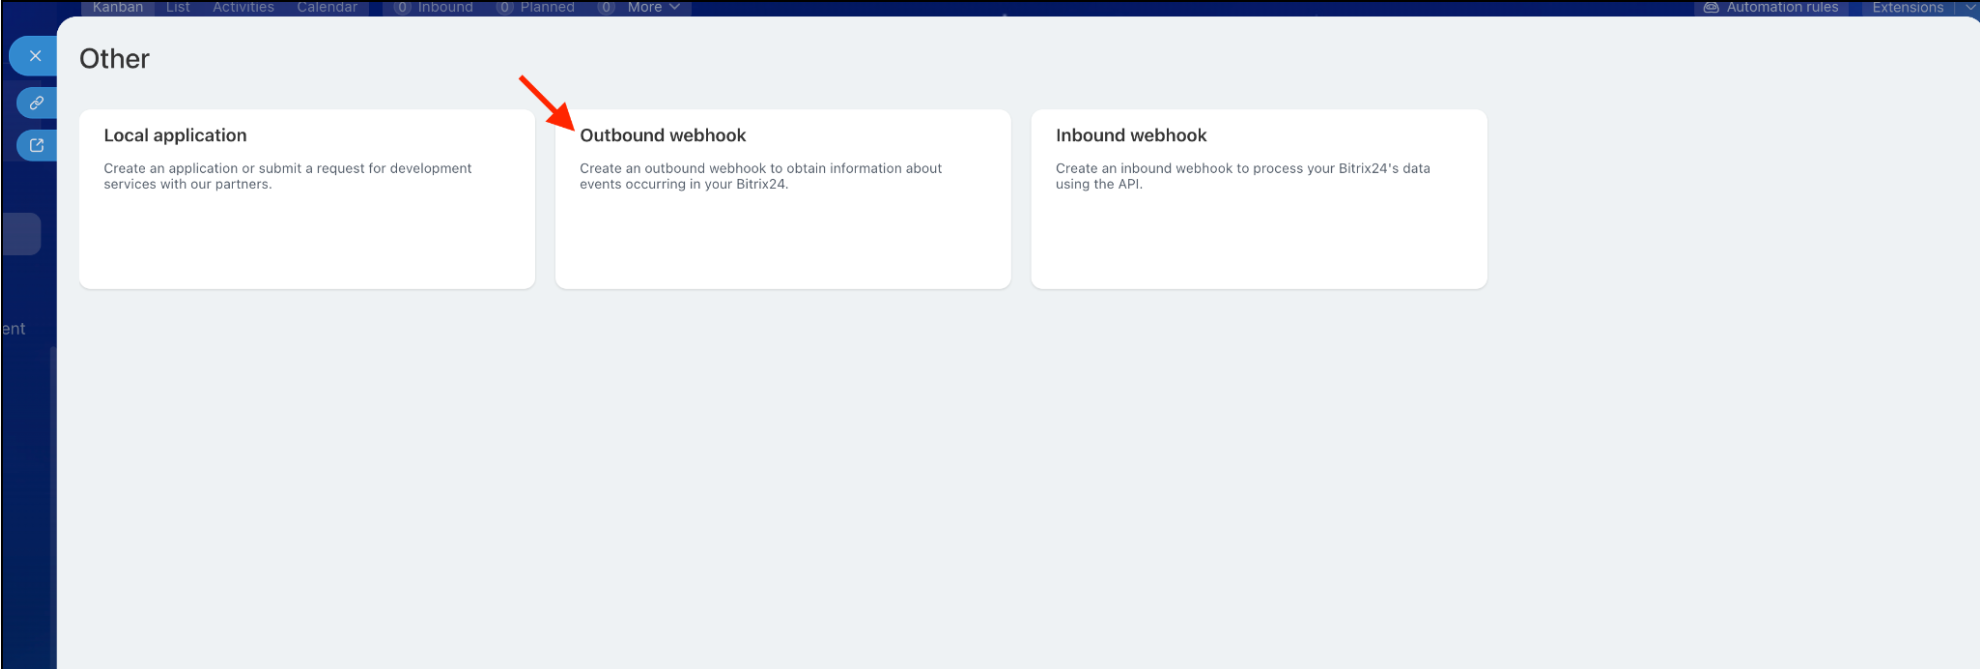
Click “Outbound Webhook”
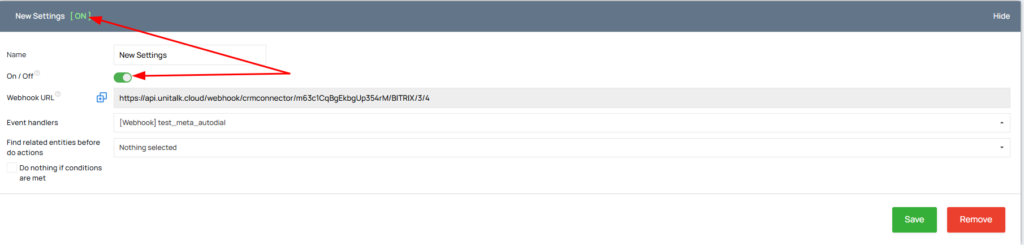
For the handler profile to start working, you must additionally enable it using the toggle switch; you can also disable it the same way. The current status — whether the profile is enabled or not — can be seen immediately to the right of the Incoming Webhook profile name.
In Bitrix24, there are two ways to configure sending webhooks, depending on your specific requirements:
- via sales funnel automation (robots);
- via global developer tools.
Below are detailed, step-by-step instructions for each configuration option:
6.2. Configuration via Funnel Automation
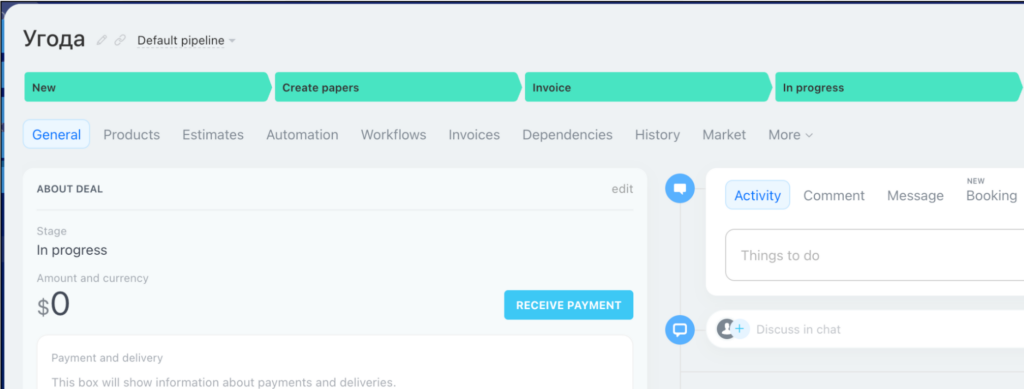
This method is ideal for cases where a UniTalk action needs to be executed when a lead or deal is moved to a specific stage in the sales funnel (for example, when a deal transitions to the “Call Required” or “Won” stage).
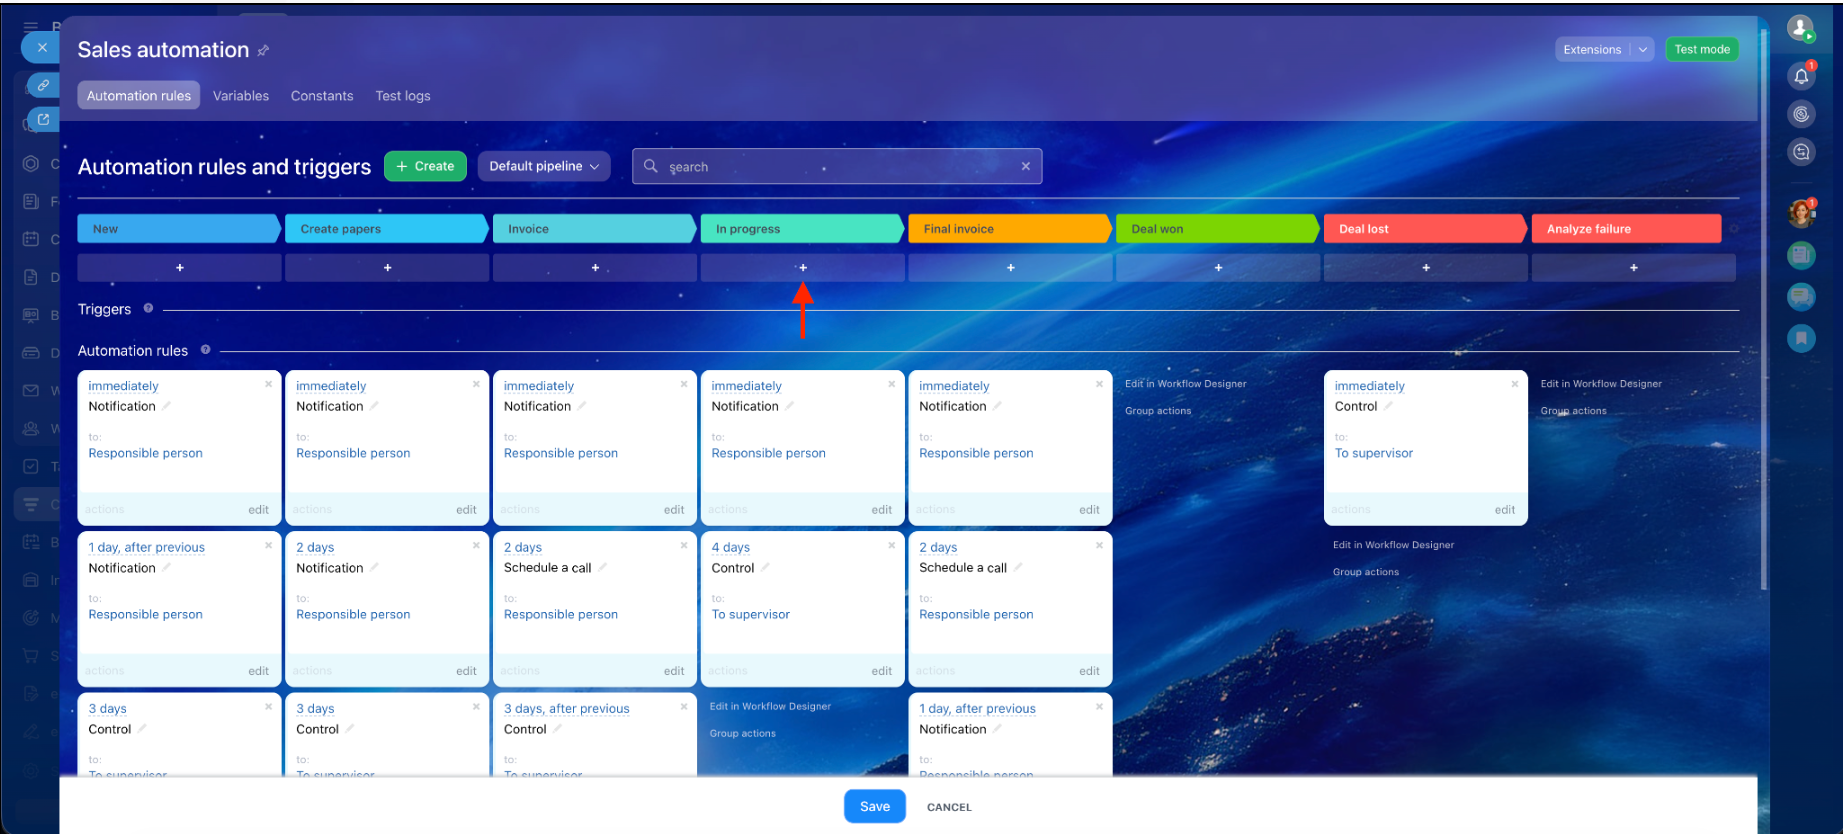
- Open Bitrix24 and navigate to the Leads or Deals section.
- In the upper-right corner of the workspace, click the Automation Rules button (in localized versions — Robots or Robots and triggers).
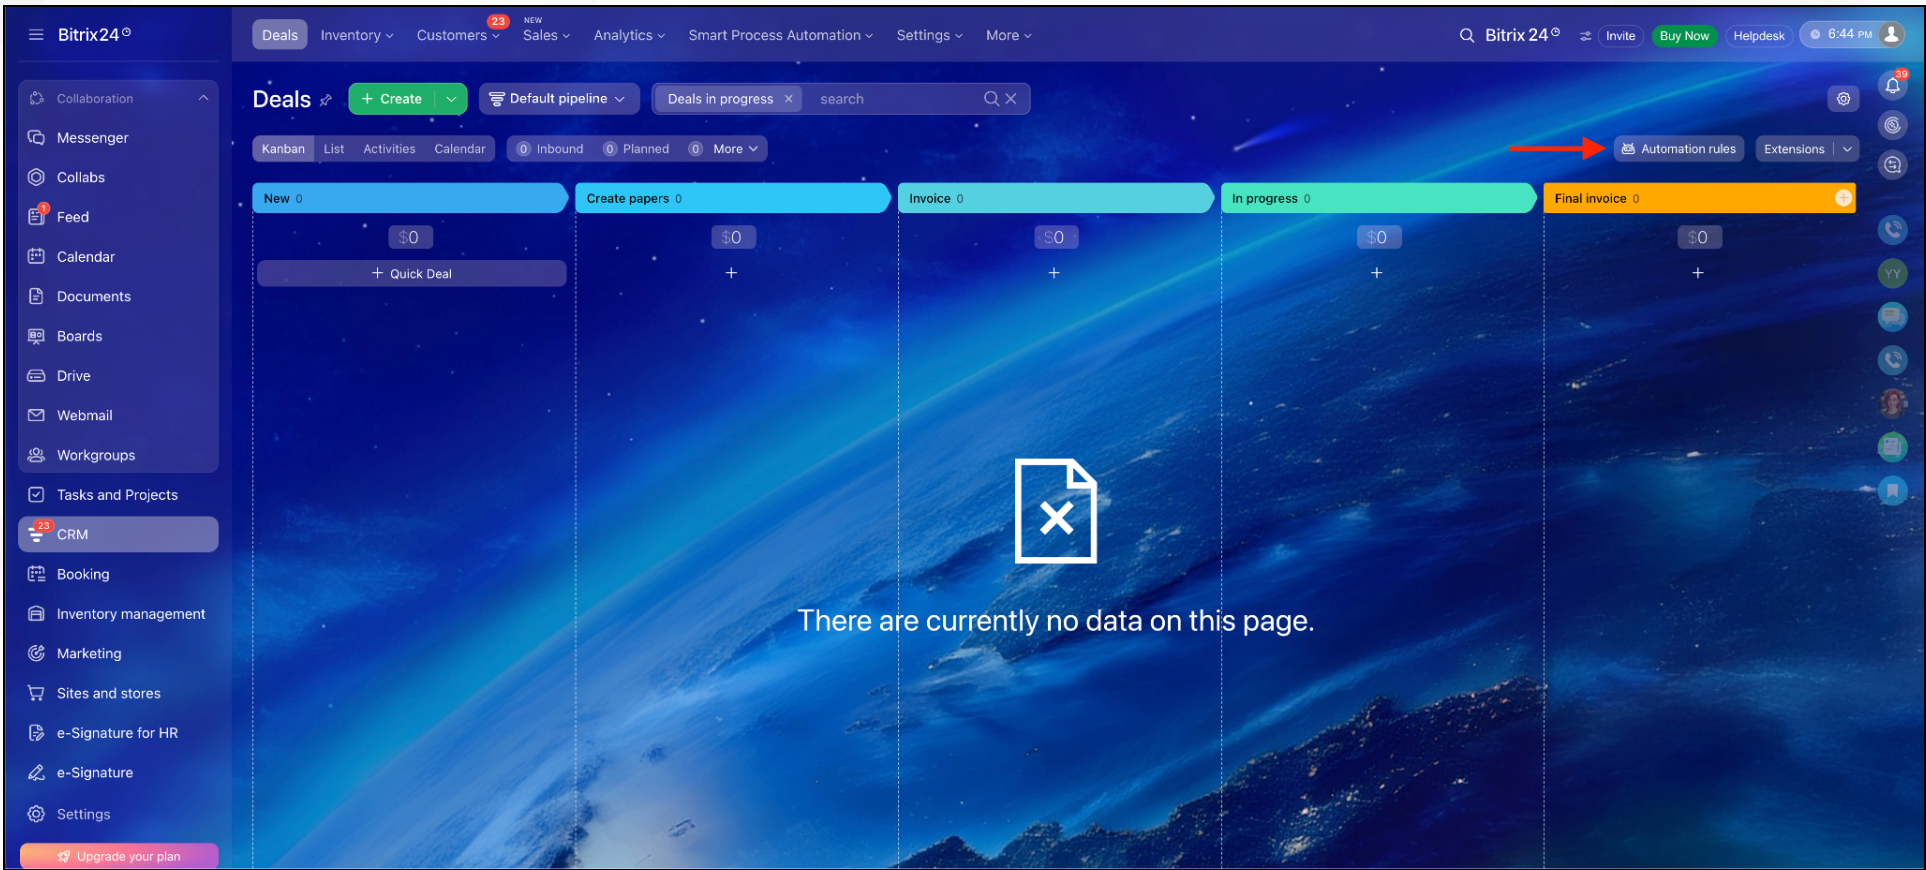
Select the stage of the funnel where the trigger should fire and click the “+” button (“Add automation rule”) under that stage.
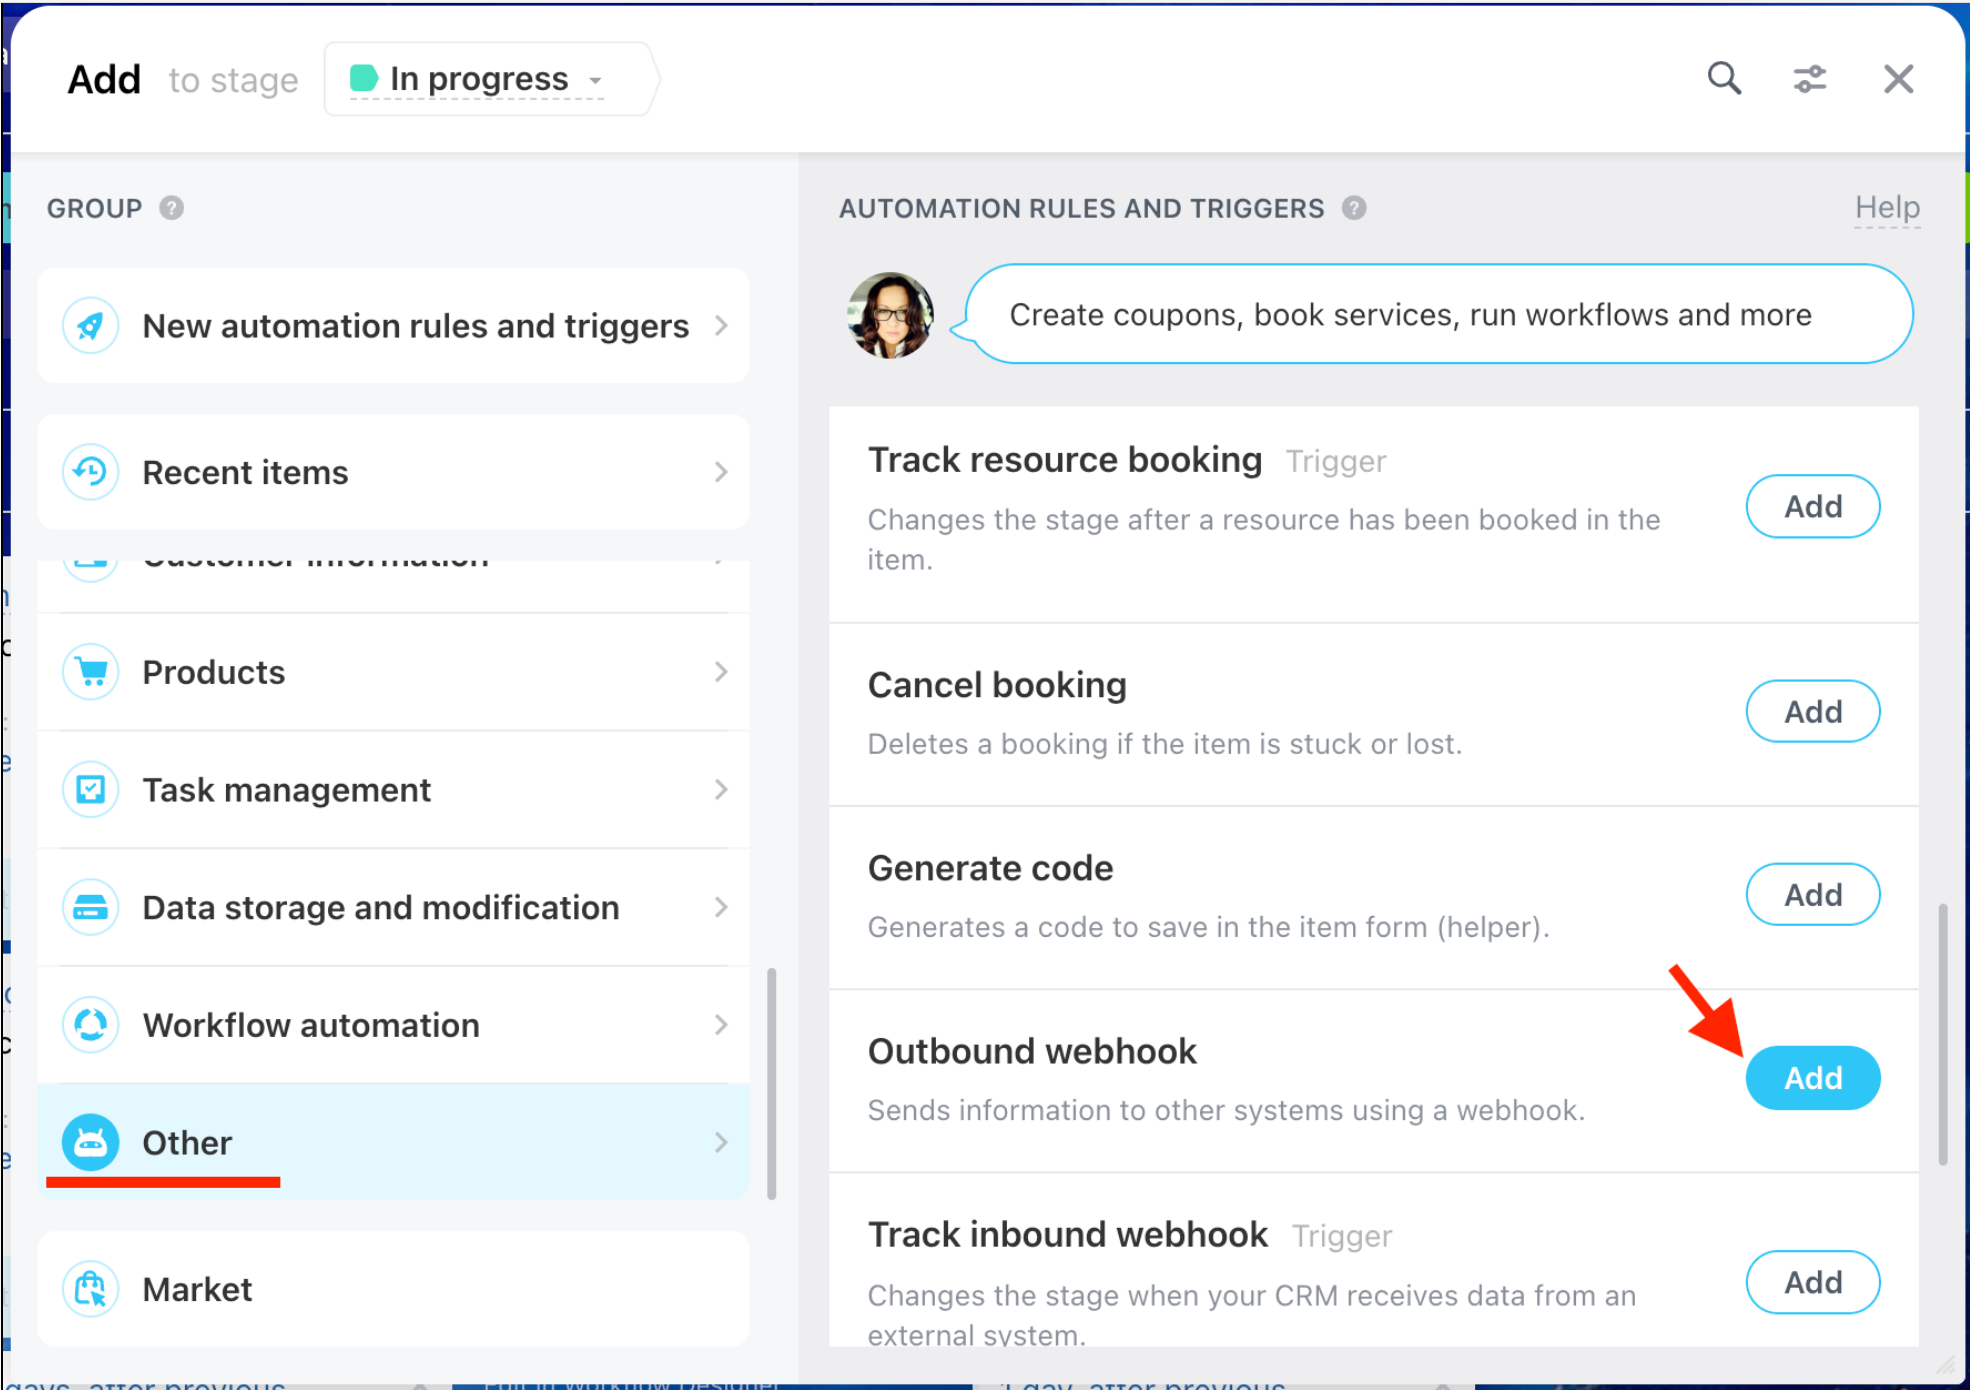
In the window that opens, select the category Other → find the item Outbound webhook and click the Add button.
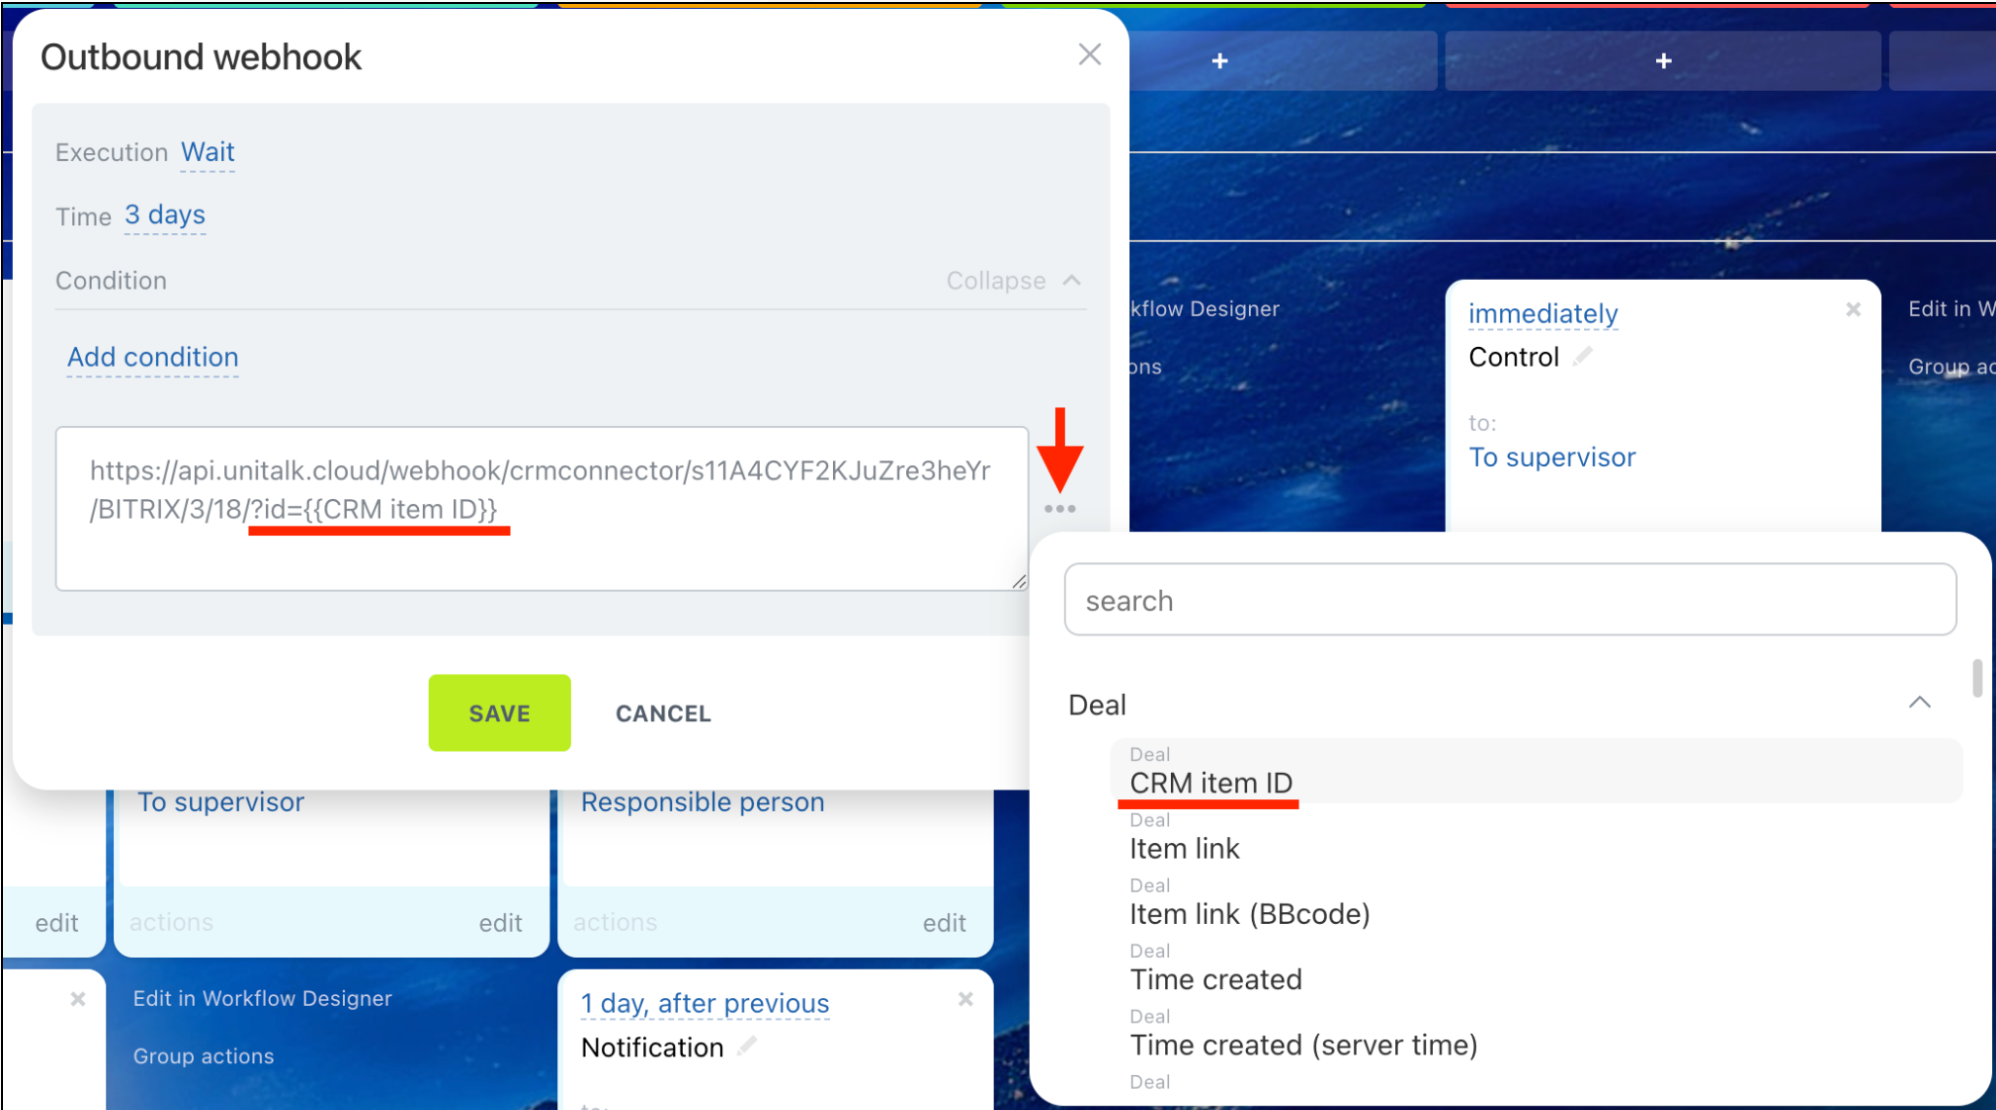
An automation rule configuration window will open:
In the URL field, paste the incoming webhook address previously copied from the UniTalk dashboard.
Important technical note: At the very end of the pasted URL, without any spaces, add ?id= and then, using the three-dots button … (the Bitrix24 dynamic field selection menu), select the ID parameter of the CRM entity (for example, ID of the deal or ID of the lead).
Click the Save button to save the automation rule settings, and then click the main Save button for the entire funnel.
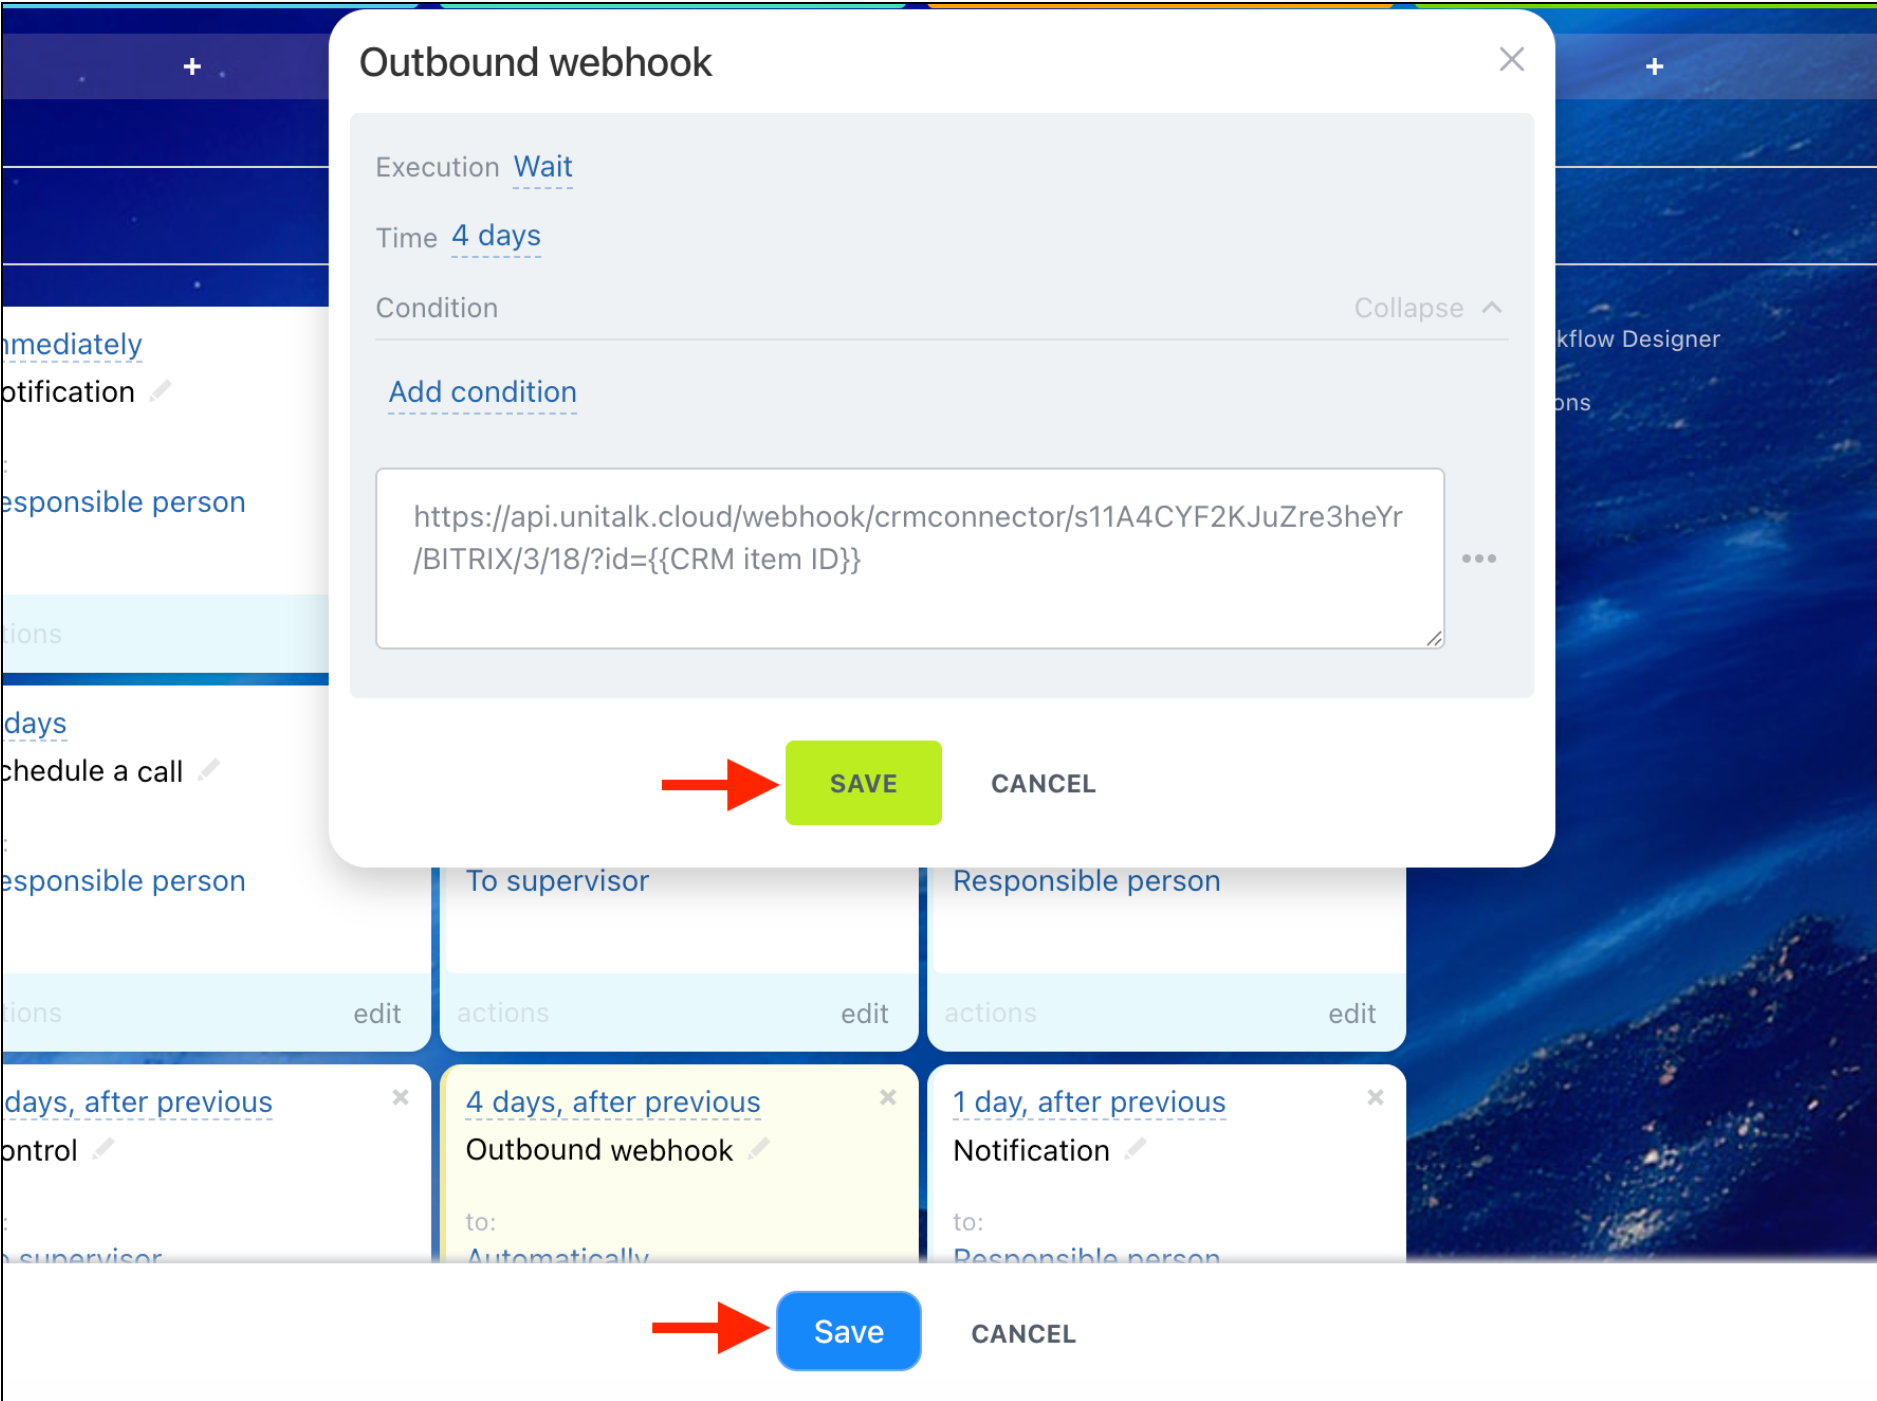
Now, as soon as a manager moves the client card to this stage, Bitrix24 will instantly send a webhook with the required ID to UniTalk, where the assigned action will be executed.
6.3. Configuration via Outbound Webhooks
This method is used for global event tracking within the system, independent of funnel stages. For example, when you need to trigger the UniTalk handler every time a new contact or lead is created, or when any field in a deal is updated.
In the left-hand main menu of Bitrix24, find and navigate to the Developer resources section (in some versions — Applications → Developers tab).
Select the Other section
In the list of available scenarios, select Outbound webhook
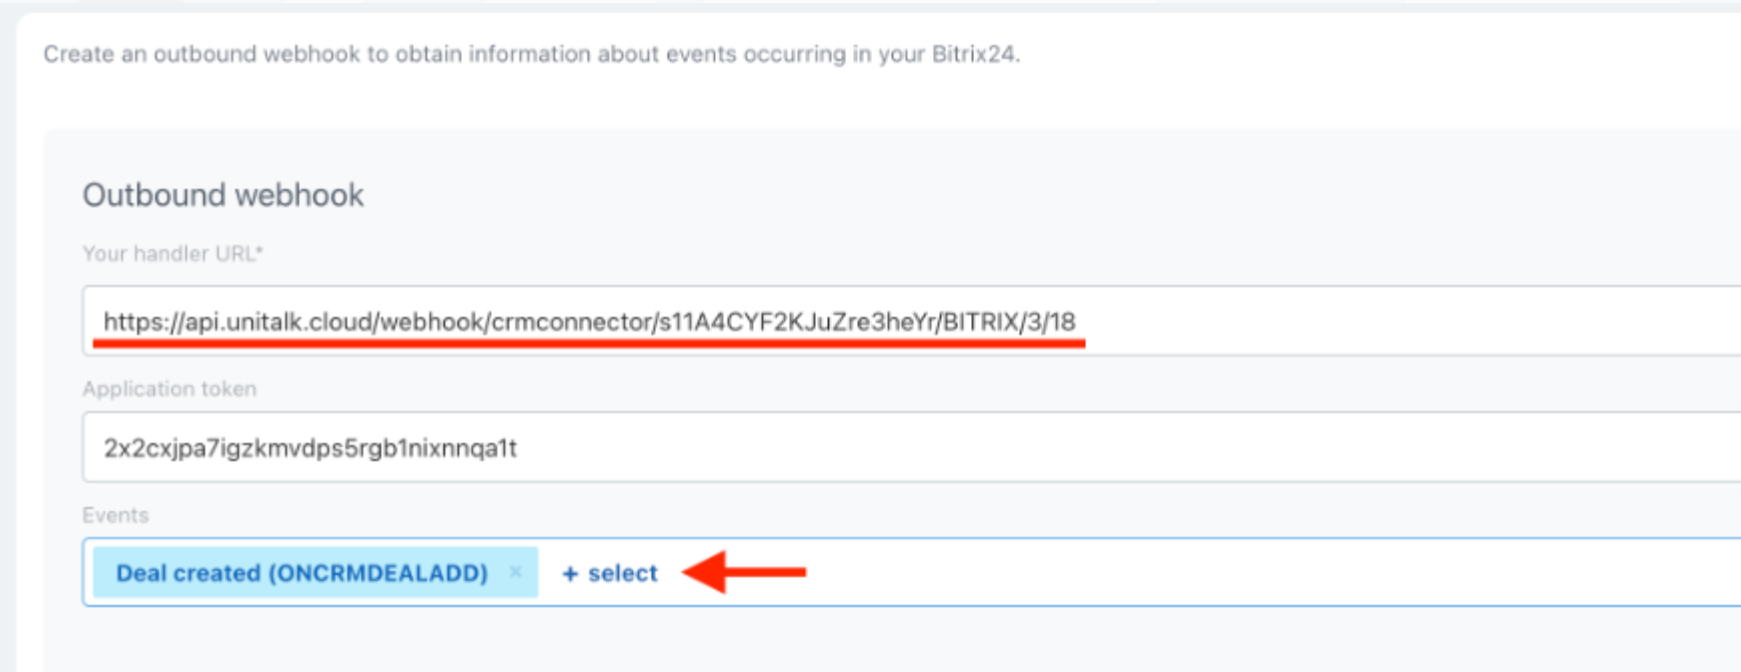
In the card configuration form, fill in the following fields:
- Name: specify any arbitrary name (for example, “UniTalk Incoming Webhook”).
- Handler URL (URL обработчика): paste the copied URL. Note: In this type of configuration, you do not need to add parameters like ?id= to the URL — Bitrix24 will automatically pass the technical block with the ID in the request body (data[FIELDS][ID]).
- Application token: leave unchanged; this field is populated by the system automatically.
In the Events (События) block, click the “Add” button or select specific system triggers from the list that the webhook should respond to (for example, ONCRMDEALADD — creation of a deal, or ONCRMCONTACTUPDATE — modification of contact data).
Click the Save button.
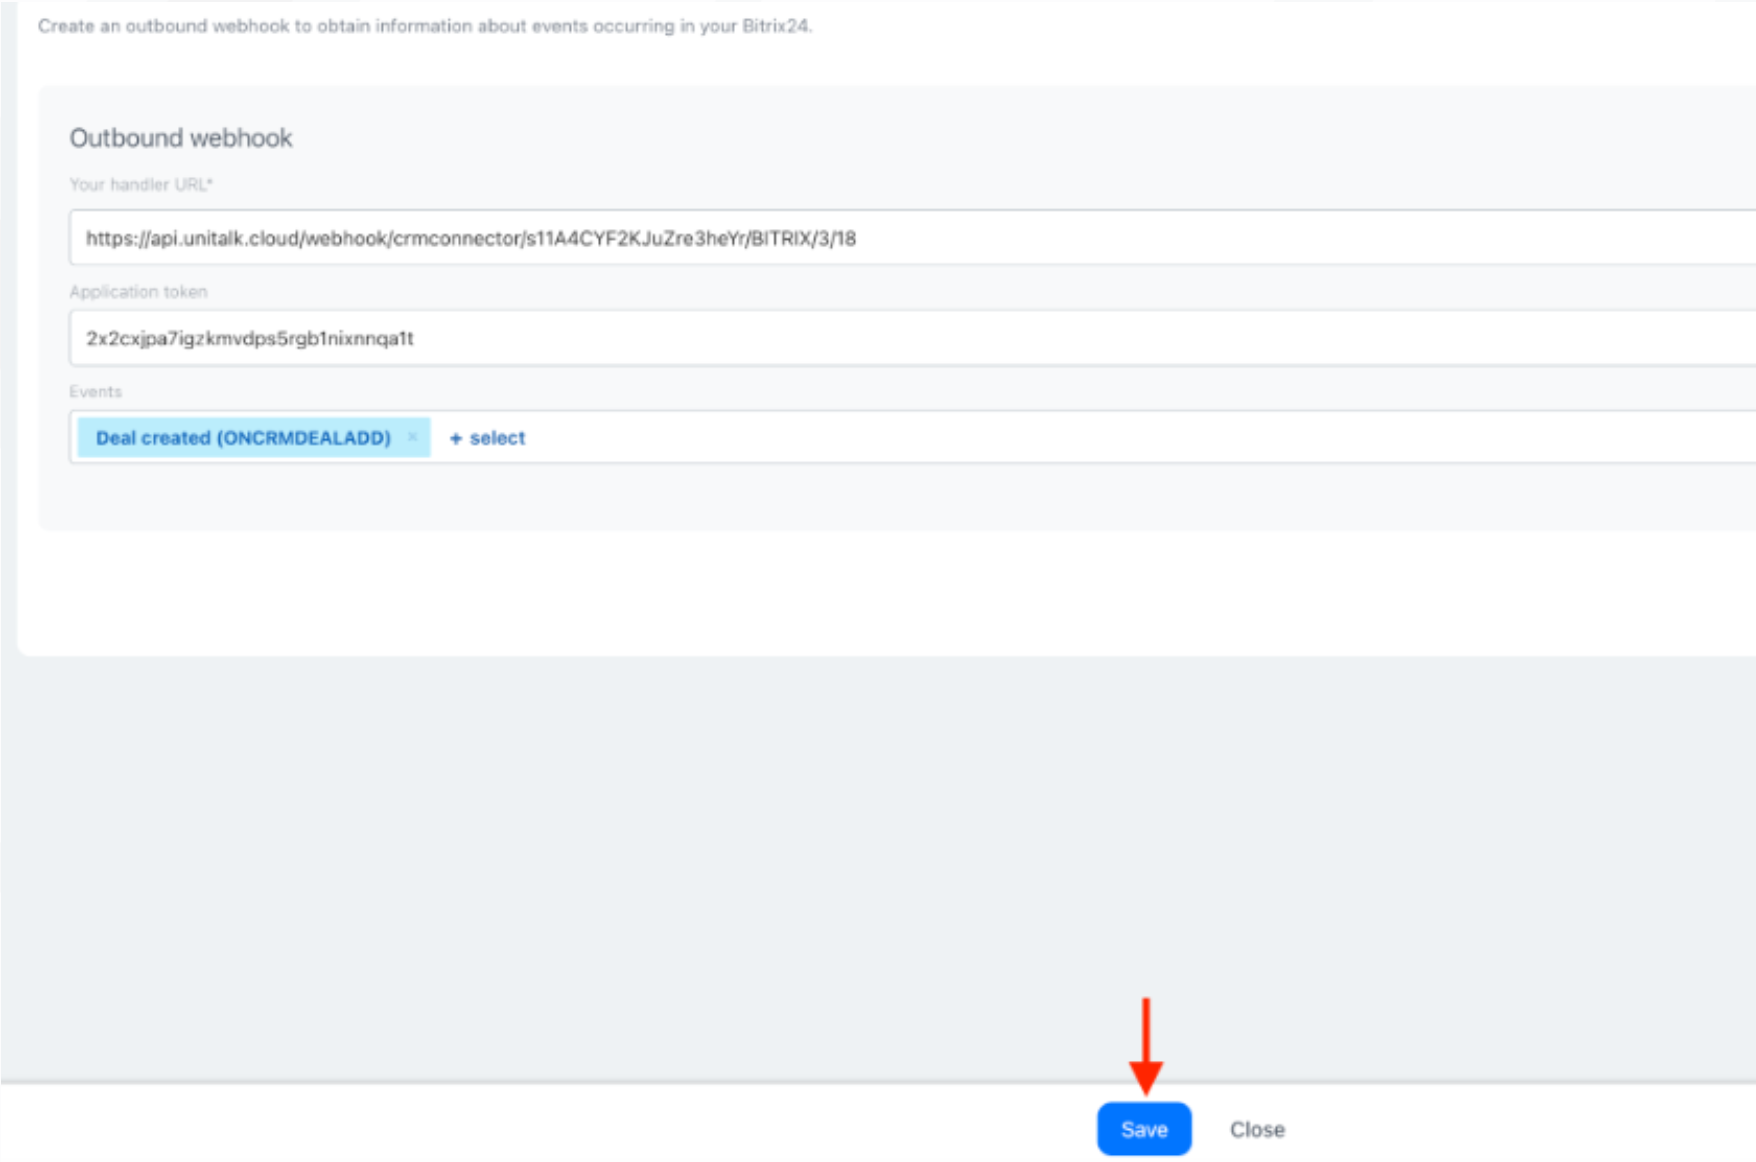
Now the system will work globally: any logging of the specified event in the CRM (including via the website API or another integration) will automatically send a request to UniTalk.
Conclusion
Omni-integration provides a unified mechanism for UniTalk to interact with your CRM system and offers flexibility in configuring scenarios for calls, chats, webhooks, and other events. Action profiles, event handlers, imports, and incoming webhooks allow you to implement both standard CRM workflows and custom automation scenarios without having to modify the integration for each individual task.